Showing posts with label direct heat. Show all posts

22 May 2012

On steak

Grilling steak

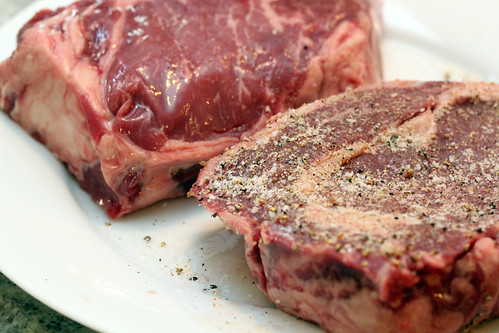
Last weekend, I popped into the Whole Foods in Cambridge. They're my go-to source for dry-aged steak. The guy in front of me at the butcher counter was also buying himself some beautiful dry-aged meat. He was having a particularly interesting conversation with the butcher:
"So, how long do I have to cook this on a grill for it to be done?"
"Well, that depends on kind of a lot of things..."
"But, how long? Say, 8 minutes a side?"
"Well, it depends on the thickness of the steak, the temperature of the grill, how well you want it cooked..."
"I use propane. How long you think that takes?"
"I really don't feel comfortable giving people times to cook..."
It was pretty painful to watch. This poor (young) butcher didn't want to tell a customer he was asking the wrong question, and the customer wouldn't take no for an answer.

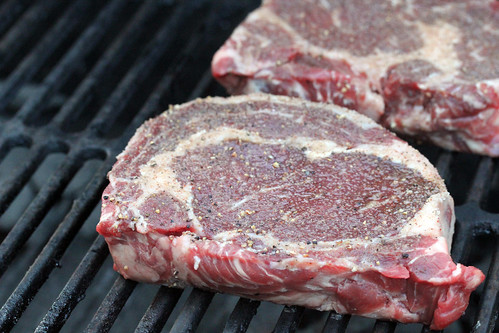
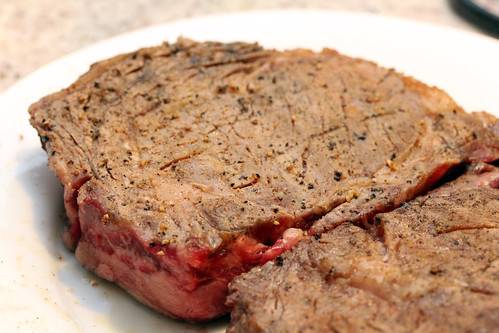
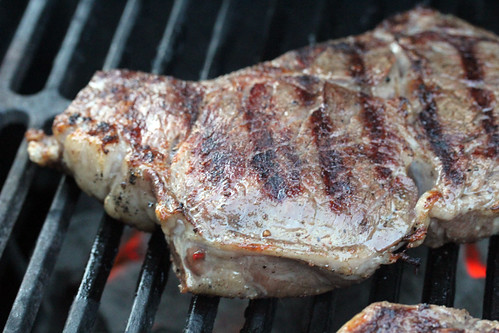
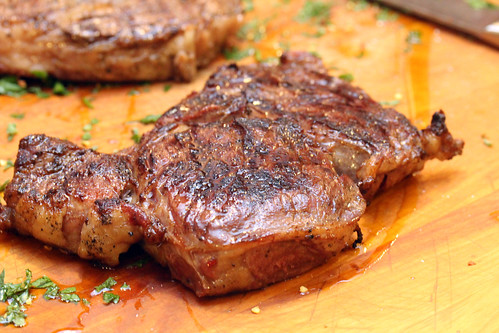
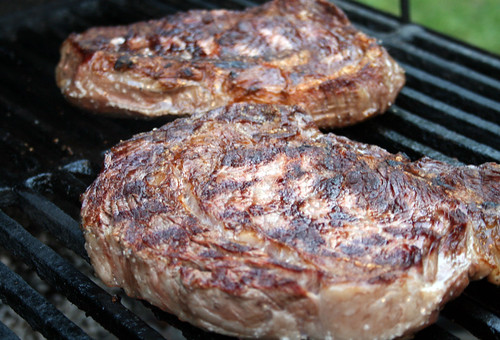
Steak really made me nervous when I first started grilling it. The difference between an overcooked and undercooked steak is a matter of a few moments on the grill, unlike a brisket, which gives you hours to make your decisions. And steak is expensive. You ruin a couple of dry-aged steaks, you've just wasted $30 worth of meat.

In general, you need to develop steak-sense. You need to practice. You need to recognize how a steak feels when it is medium. How it feels when it is medium-rare. Make a fist. Poke the muscle between your thumb and your hand on that fist. That's medium-rare. Softer is rare. Firmer is medium.

Mrs. Dude likes her steaks medium to medium-well. I put a lot of steaks back on the grill for her to firm them up, before I learned to recognize a medium-well steak without cutting into it.

Practice. Poke. Get a feel for how firm they need to be. This is a good steak recipe to start with. But no one can give you precise times or temperatures. You just need to practice. So go ahead, eat steak more often.
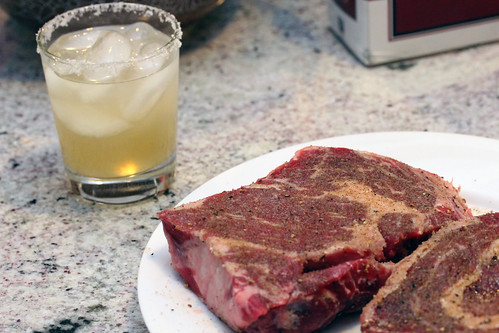
It's not all bad...

Dry-aged steak in Cambridge:

Whole Foods Market
340 River Street, Cambridge, MA 02139
(617) 876-6990 ‎
Mon-Sun 8 a.m. - 10 p.m.


View Larger Map

By

17 May 2012

Charred & Scruffed-inspired ribeye

So with the imminent arrival of summer, we should be returning to lots and *lots* of smoked and grilled meat. And this summer, unlike last summer, we're not moving cross-country, so there will be nothing distracting the Dude family from plenty of bbq'd meat. Conveniently, the object of my man-crush (Adam Perry Lang) has published a new book. Charred & Scruffed. After his Serious Barbecue, I've been a huge fan.

Well, Charred & Scruffed is a bit more faddish. There are several silly techniques in this book. Rather than creating various heat zones on the grill, he advocates cooking your meat high off the grill (by creating towers of bricks on top of your grill), or cooking close to the coals. Okay, well... that's silly. I create crazy hot and less hot zones in the bbq (based on number of screaming hot coals). But, as always, his flavors are *on*. This steak is inspired by his "High-Low Boneless Ribeye".

We start with the rub:
2 tbsp kosher salt
1 tsp garlic powder
1 tsp fresh ground pepper
¼ tsp cayenne pepper
Mix the rub and sprinkle all over your boneless ribeye steaks (we've done this several times now, it's better if your ribeyes are dry-aged).

Steak

Let the rub soak in, while you get a crazy hot charcoal fire on your grill. Make a drink. A margarita, perhaps.

Steak

Also, make your basting butter:
¾ cup extra virgin olive oil
5 tbsp unsalted butter
½ tsp soy sauce
½ tsp Worcestershire sauce
½ tbsp dark brown sugar
1 tbsp grated garlic
½ tbsp fresh thyme leaves, chopped
1 tbsp grated onion
1 tsp kosher salt
1 tsp freshly ground black pepper
½ tsp red pepper flakes
¼ cup cider vinegar
½ tbsp ketchup
½ tbsp yellow mustard
Combine all of these ingredients in a saucepan. Heat over low heat (there's something naughty about melting butter in olive oil). Mix frequently, remove from heat when everything is melted and well mixed.

Basting butter

When you get crazy hot coals, arrange the coals in your bbq such that you have a crazy hot space (high density of charcoal) and a much less dense space (for cooler grilling).

This recipe is backwards from many. Rather than using high heat to caramelize your steak, then cooling it down to finish it, you're going to slowly heat your steak over the cool coals, flipping frequently. This is just to get your steak hot.

Steak

After twelve-ish minutes, when your steaks are nowhere *near* cooked, remove them from the heat.

Steak

Baste them all over with the basting butter. Slather them with basting butter, and let them hang out for a few minutes. Given that the basting butter is a mix of fat of delicious juices, make sure you're mixing frequently as you're basting (this is no emulsion, it's a juicy fat-bomb).

Now, toss them back over extremely high heat. (Keep in mind, this method will not produce beautiful, perfect grill marks - but as our saviour Adam Perry Lang says - do you want those anyway? We aim for delicious.)

Steak

Alright, now flip every one to two minutes.

Steak

When they feel done, they're done. Medium-rare feels like that fleshy spot between your thumb and your hand when you make a fist. Drizzle a cutting board with olive oil, lime juice, chopped parsley and cayenne.

Prepared cutting board

Toss your cooked steak onto the cutting board to rest.

Steak

After five minutes (if you can stand waiting) - serve.

This is Mrs. Dude's new favorite steak. I expect to make this many times this summer. Happy grilling.

EDIT: Many thanks to reader Joerg for catching a few typos. Please contact me with typos you identify.

By

29 November 2011

Catfish sandwiches

Mrs. Dude recently had another lovely birthday. She is more ravishing today than the day that I met her.

On her birthday, she can pick whatever she wants to eat. Some years it is complicated. Some years it is simple.

On this year, our year of moving, packing, unpacking, job-changing, settling in to a new city and all the excitement that has entailed, Mrs. Dude chose simple. She chose catfish sandwiches, bless her heart, a recipe that I first cooked for her in the late 1990s.
3/4 cup mayonnaise
3 tablespoons sweet pickle relish
1 ½ tablespoons drained bottled capers, chopped fine
1 tablespoon Dijon-style mustard
1 tablespoon fresh lemon juice, or to taste
a pinch of cayenne
1 tablespoon bottled cocktail sauce, or to taste

Mix the ingredients above to make the sauce.

Sauce

For the sandwich:
all-purpose flour seasoned with salt and pepper for dredging the fish
2 large eggs, beaten
½ teaspoon salt
¼ teaspoon cayenne
cornmeal for dredging the fish
four ½-pound catfish fillets, halved crosswise
vegetable oil for deep-frying the fish
8 soft sandwich rolls, split
soft-leafed lettuce for the sandwiches
2 tomatoes, sliced thin
16 slices of lean bacon, cooked

Slice the tomatoes.

Tomato

Fry the bacon until crispy. Set aside the bacon on paper towels until ready to serve.

Make several trays. One with flour. One with the beaten eggs. One with the cornmeal.

Dredge the catfish through the flour, until thoroughly coated. Then dredge through the eggs. Again, thoroughly coat. Finally dredge through the cornmeal. You'll have a nice, layered catfish fillet at this point.

cornmealed catfish

Put 2 inches of oil in a deep pot. Heat the oil in the pot to 350°F.

Hot oil

Set the fish gently into the hot oil. The trick with screaming hot oil is to not be afraid of it. If you drop the fish in from a height, you'll splash and burn yourself. Set the fish gently into the oil and you won't splash and won't burn. Really.

Fried catfish

Cook a few minutes (1-3) per side, until nicely browned.

Fried catfish

Remove from the oil after you've cooked on both sides. Set on a paper towel to drain.

Assemble the sandwich with a nice bread, sauce, lettuce, tomato, catfish and bacon. Mmmmmmmmm.... bacon...

Catfish sandwich

Served with:

Served with

Happy birthday, beautiful.
By

25 August 2011

Lobster

Cooked lobster

My dad was the anti-foodie. Almost every dish my mother ever served was a "B+". He would stroll away from the dinner table, not full. Food was merely fuel. The enjoyment at the dinner table was found in discussion and debate, not on the plate.

There was only one food I can remember that made him excited. In the 1950s, he spent time in the Cape Breton region of Nova Scotia. It is there that he learned to love lobster. When he brought me there in 1989, he introduced me to one of the most fabulous sources of protein on earth.

I have spent as much as $40/pound to have the pleasure to cook lobster in some of my other homes. Imagine my surprise, then, to drive through southern Maine and see signs advertising $4/lb lobster. It turns out that those signs are teasers, to get 3 x 1.5 lb lobsters cost us $28. That's right, something a little more than $6 per pound. We suffer.

Lobster purveyor

My wife picked up three lobsters on a Wednesday at the Maine Lobster Outlet. So after work, I heated up two pots of water (one per lobster - we're in a sublet and don't have a big pot). Each pot had:
4 quarts water
8 tbsp salt
Alternatively, you can use fresh seawater if it's handy.

Bring to a rolling boil while you play with your lobsters.

Live lobster

When the water is boiling, pick up the lobsters. Some people like to make the lobsters sleepy by having them hang out in a fridge for a while. Not necessary. You just need to act swiftly, so the lobster doesn't have time to think about his impending doom. Open up the pot, pick up the lobster and hold him head (and claws) pointing down. Then swiftly move him over the pot and drop him in. If you hesitate, all is lost. The lobster will sense the heat, and recoil. You want to drop him in there head-first so that he is killed instantly and has no time to react. The benefit here is that this is more humane, and it's less disturbing and wiggly to try to get the lobster in the pot if you do it quickly.

Let the pot return to boiling. As soon as it does, start the clock (watch carefully, there's nothing more sad than an overcooked lobster). A 1 ½ lb lobster does well with about 11 minutes of full-on boil time. Really, don't overcook the lobster. Overcooked lobster is tough and bitter.

Remove the lobster from the boiling water at the end of your counter.

Cooked lobster

Let cool a few moments. Serve with a dish of melted butter. It's not a terrible idea to wear a raincoat while dismembering the lobster. There will be a mess, be forewarned. Dab the meat into the butter. And don't forget, the claws have the best meat. The knuckles, second best. And the tail has the most meat (though a bit tougher).

This is a simple way to make lobster, and in Massachusetts, it even makes sense on a Wednesday night. Ridiculous.

Lobster meat


By

02 August 2011

Shakshuka

So, as it happens, we've moved about as far as you can between two major cities in the U.S. San Diego to Boston. Southern Cali to New England. Fish tacos to lobster. So, I suppose even Indirect Heat has to make a few changes.

Well, I'm semi-bbq-less for the summer (I have access to a hibachi, but I've been too lazy to get charcoal and use it in our limited-space-sublet thus far). So I'm exploring my non-bbq options for a few days. And while I'm doing that, why not explore my meatless options. Yes. It's true. I'm cooking vegetarian tonight.

Shakshuka

I found this book Plenty in the Harvard COOP (incidentally, the best food section of any bookstore ever - just sayin'). It's a vegetarian book. But it's my kind of vegetarian book. In the intro it says:
The New Vegetarian (the author's column) ... made some Guardian readers extremely unhappy to learn that the new vegetarian wasn't a vegetarian at all. A couple of angry letters to the editor stick in my mind and an incident where I suggested serving a salad with some barbecued lamb chops.
A vegetarian cookbook that suggests serving vegetarian fare next to lamb chops? This is my veggie book. Yes, yes it is. This is a book with bold flavours and fun dishes. I've already cooked several dishes out of this book, and will blog about them soon. This is a book of deliciousness.

Tonight, we serve Shakshuka. A delicious Tunisian mix of tomatoes, herbs and eggs. This one seems like it's going off the rails right up until serving time, when it comes together into a delicious mess of eggs and veggies. Yum.

We start with:
¼ tsp cumin seeds
13 cup olive oil
1 large onion, sliced into rings
1 red bell pepper, cut into strips
1 yellow bell pepper, cut into strips
2 tsp muscovado sugar
1 bay leaf
3 thyme sprigs, leaves picked and chopped
1 tbsp chopped parsley
1 tbsp chopped cilantro, plus extra for garnish
3 large ripe tomatoes, roughly chopped (or 6-7 small tomatoes)
18 tsp saffron threads
large pinch cayenne
salt and pepper to taste
water
4 eggs
Toast the cumin seeds for 2 minutes in a dry pan over high heat until fragrant. You don't want them bitter, so take care not to over-toast. Pour in the oil and toss in the onion.

onions

Cook the onion 3-5 minutes. Add the peppers, thyme, parsley and cilantro and sugar. Cook over high heat for 5-10 minutes, or until the peppers and onions start to take on some colour. The browned onions and peppers will flavour this dish.

Turn down the heat to low. Toss in the cayenne, saffron, salt and pepper.

saffron shards

Toss in the coarsely chopped tomatoes and the bay leaf.

gamish

Simmer over low heat for 15 minutes. Add water to keep the consistency about a thick pasta-sauce consistency. Taste and adjust the seasoning as appropriate (I added a lot of salt to this to get it right).

Remove the bay leaf, and transfer to a shallow pan over low heat. Make 4 wells in the sauce and put one egg in each well. Cover, and continue to cook until the eggs set (about 8 minutes for me).

Shakshuka

Garnish with chopped cilantro, and serve with a bright white wine..

Served with...

This was surprisingly good. I've adjusted it to dial back the saffron a bit, but otherwise this is a fantastic dish. Bright and flavourful. Rich from the soft egg yolks. And messy. Really, really messy to serve.

We'll be serving this again.

By

10 May 2011

Ginger-garlic half chicken

A new grilling season is upon us, and it's about time. This time of year, I fire up my grill three to four times a week. Come home, fire up the grill, crack a beer and make dinner. Bbq Jr. playing in the backyard, Mrs. Dude lounging on the patio, it doesn't get any better than that. Particularly if you can find time to grill on a weekday.

Japanese grilling is particularly well-suited for a weeknight. The marinades are simple, the grilling is short and the flavours are really clean. Today, I feature a recipe from The Japanese Grill. It has the added benefit of being an excellent stress release. You get to rend a chicken. Yes.

Chicken

We start with:
½ cup soy sauce
2 tbsp sake
2 tbsp grated fresh ginger
4 gloves grated garlic
2 tsp tobanjan
2 tbsp brown sugar
1 tsp salt
1 whole chicken

The only hard-to-find ingredient in here is tobanjan.

Tobanjan

This is a Japanese sauce preparation made with Chinese hot peppers. Think Tabasco, thicker and sweeter. Really tasty, though. Available at your local Japanese grocer, (I got it at Nijiya in San Diego).

Chop and peel the ginger. Grate the fresh ginger, into a smelly, disgusting pudding of gingerness. Yum.

Grated ginger

Mix well with everything except the chicken.

Marinade

Meanwhile, get out your cleaver, and rend the chicken down the length of the chicken. I found this tremendously satisfying, and very quickly accomplished.

Dismembered chicken

Slather the marinade into every crevice and every surface of the chicken. This may take a few moments, but you're only marinating long enough to get the grill hot, so don't skimp on the slathering step.

Dismembered marinated chicken

Fire up the grill. You want medium hot, not too hot. You don't want to start a chicken-fat-fire, so really. Medium hot. Lay the chicken over the grill skin-side down.

Grilling garlic ginger chicken

Leave for three-ish minutes.

Flip.

Grilling garlic ginger chicken

Now you'll want to cook 7 minutes, flip, 7 minutes, flip, 7 minutes, flip... you get the point. For a total of about 35 minutes. Avoid flareups if you can. Baste frequently with the marinade (don't baste the last 7 minutes to avoid contaminating the chicken). Close the grill whenever you can to build up the extra heat, but be aware of flareups. You don't want flames putting soot on your beautiful chicken.

Meanwhile, enjoy your beer. And your family.

Grilled ginger garlic chicken

Grilled ginger garlic chicken

Remove from the grill. Let rest for five minutes. Cut up and serve.

Grilled ginger garlic chicken

This will produce the most sweet, moist chicken you've ever had. Beautiful. The marinade is slightly sweet and spicy (Bbq Jr. declared it "Spicy. But not too spicy."). And something you can get on the table in just over an hour. Serve with some rice and a salad, and you have a meal. Delicious.

By

26 April 2011

Grilled rabbit with basil oil

In 1994, I was in college, living in the dorm of the Faculté St. Jean at the University of Alberta. It was a fantastic place to live, a converted 150-year old monastery. Two kitchens shared by 100 or so students.

I decided (with a friend of mine) that a fun way to spend Easter would be to have rabbit. Cooking the Easter Bunny, so-to-speak. This has turned into a hilarious tradition. Something the Dude household does almost every year (I confess, in the last 15 years, I've missed one or two). Most years, though, we have Easter bunny for dinner. Like last year, when we served Chocolate Easter bunny.

This year I wanted to serve something that was more true to the ingredient. More fresh. And something that showed off the flavour of the rabbit more than I had in previous years.

I chose a grilled rabbit recipe, adapted from this one:
4 legs of rabbit, top bone of the thigh removed (ask your butcher to do this)
2 tbsp olive oil
Sea salt and freshly ground black pepper
4 very ripe sweet heirloom tomatoes, sliced into rounds
1 small bunch basil
It's hard enough to find rabbit, much less to find rabbit legs. So, purchase your rabbits.

Rabbit

Remove the rabbit legs. Apply a cleaver to the joint at the division between the spine and the leg. Save the remaining rabbit carcass for other stuff (posts coming soon).

Rabbit legs

Warm the rabbit legs to room temperature, about one hour.

Meanwhile, prep the sauce:
3 large bunches of basil
1 clove of garlic, peeled
Sea salt and freshly ground black pepper
2 tbsp extra-virgin olive oil
Put the basil leaves into your food processor.

Basil oil

Add the garlic and sea salt. Grind more.

Basil oil

Drizzle in the oil, while blending. I like the basil oil as a thick gamish (close to a pesto). If you prefer it runnier, add more oil. Season with salt and pepper to taste.

Basil oil

Now, back to the rabbit.

Heat up a grill. Hot. Really, really hot. Really hot. Can you make it hotter? No? Now it's nearly hot enough. Make it hotter.

Okay.

Season your warmed rabbit legs with a coarse salt and pepper. Put those seasoned legs on the hot, hot grill.

Grilling the rabbit legs

Cook five minutes on that side, until good and brown on one side. Flip.

Grilling the rabbit legs

Cook another eight minutes, until done. While finishing the rabbit, slice the tomatoes and put two slices on each plate. Slather on some basil oil and salt.

Rest the rabbit legs a couple minutes, then place on top of the tomatoes. Add a little more basil oil on top and a few basil leaves and serve.

Served, plated bunny leg

You know how you sometimes hear people saying that they want the preparation of a food to be "true to the ingredient"? This is one of those preparations. It's simple, you can taste the uniqueness of the rabbit meat, but it has some tasty additions. Eat this today. It's delicious.

Serve with:

Served with

Enjoy.

By