31 July 2009

Ostrich egg

Ostrich egg/chicken egg

San Diego has the world's most fantasticest zoo. And the associated Wild Animal Park is crazy good fun for kids of all ages. Rhinos. Elephants. Ostriches. All in something that vaguely resembles their home environement.

Our 3-year old son *loves* the animal park. I am... ambivalent. But I acquired more enthusiasm for it on our most recent trip when we passed not one, but two stands on the way out to the Wild Animal Park that sells ostrich eggs and ostrich meat. HURRAY for ostrich eggs.

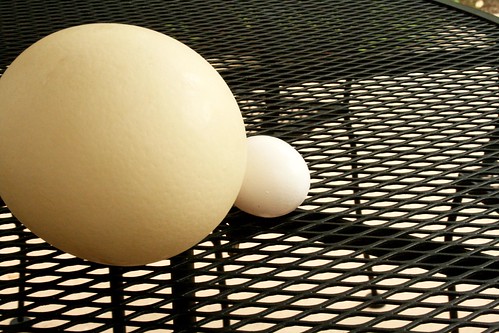
They're fracking huge. And they sell for $25 each (though to be fair, they also sell the shells for $20, which says that the contents of said egg are really only worth about $5).

Well you know that I had to have one. So I forked out $25 a brought one home (shown above next to a chicken egg).

Ostrich yolk/chicken yolk

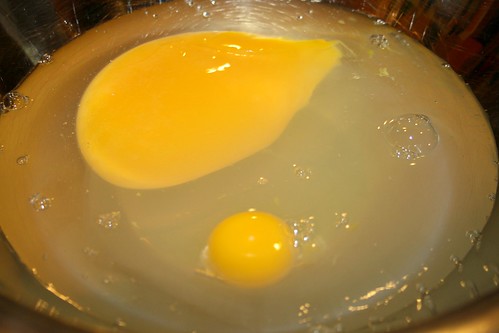
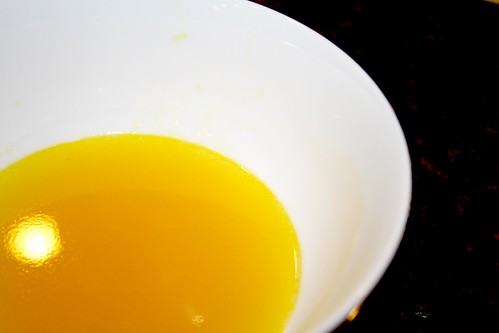
I didn't know what to do with my new ostrich egg. I mean, really? How do you showcase the ostrichy flavour? Scrambled eggs, I guess. I cracked it into a bowl with the chicken egg for scale. The yolk is HUGE. HUGE.

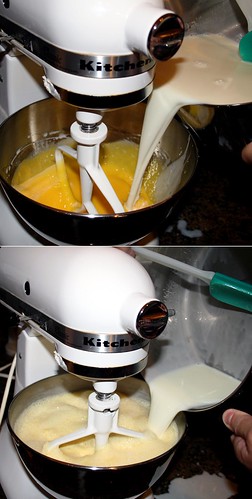
And thick. To beat that egg yolk took some serious work. It was almost pastish. Clearly a thicker egg yolk than chicken eggs.

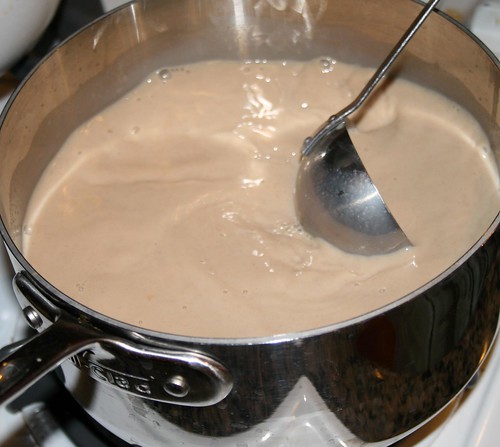
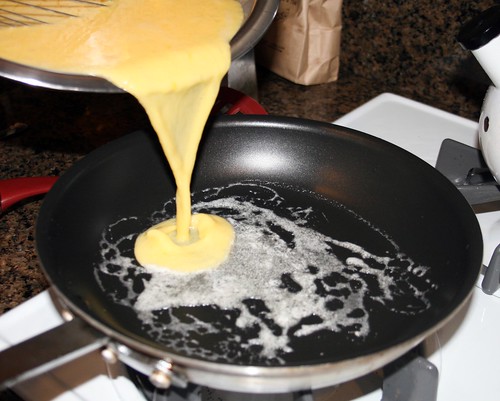
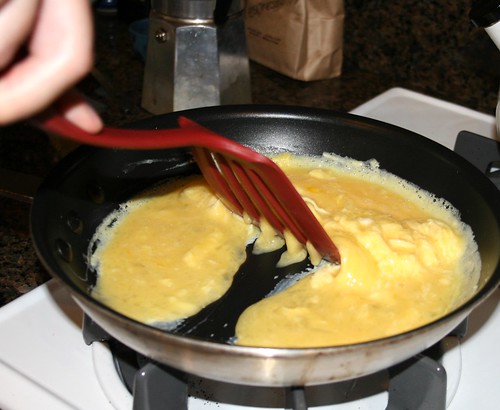
Well, I scrambled that bad boy, and poured it into the pan.

Scrambled ostrich

I gently fried the egg with butter and salt. We really wanted to be able to taste

Scrambled ostrich

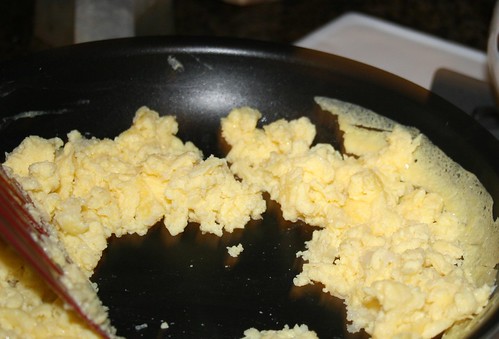
Look at how fluffy the ostrich egg became. Light and fluffy. Much more so than a chicken egg. It was truly striking how different the texture was from a traditional chicken egg.

Scrambled

Served with homemade bacon... delicious! While the flavour wasn't all that different from a chicken egg, the texture was marvelous. I wish I had made omelets. The fluffiness was perfect.

Scrambled ostrich egg and homemade bacon

I froze the leftover liquid egg mix in 2 ice cube trays, and will use them as chicken eggs in the future. One ostrich egg is a damn lot of egg. And I have a beautiful ostrich eggshell leftover on on the shelf in my kitchen. Win win win!

28 July 2009

Cow head!

I think everyone in the world should be linking to this awesome cow head post at Homesick Texan. Go read it, now! It'll change your life! Cow Head!!!

Fajitas!

I'm going to continue the Serious Barbecue lovefest here on the blog. I've been having a lot of fun with the book, and only major successes. No failures so far. Today's installment of the Adam Perry Lang lovefest will focus on making super delicious fajitas. I've included links to several of the sides from this blog, and also a link down below to making tortillas in the style of the Homesick Texan.

Ok then, we start with a couple flank steaks. At Costco, you can get a huge packs of the stuff for about $4.50 a pound. And what delicious looking meat.

So make yourself a marinade:
1 tbsp crushed hot red pepper flakes
2 tbsp boiling water
1 cup water
1/2 cup apple cider vinegar
1/4 cup freshly squeezed lemon juice
2 tbsp worchestershire sauce
2 tbsp tabasco or hot sauce
1 tbsp soy sauce
1/2 cup grated sweet white onion
10 garlic cloves
1/2 cup dark brown sugar
1/4 cup prepared yellow mustard
1 tbsp kosher salt
2 tsp fresh thyme
Extract the heat of the red pepper flakes in the boiling water a few minutes. It looks quite beautiful.

Marinade hot peppers

While it's extracting, mix the other ingredients.

Marinade herbs

Now add the peppers and run the ingredients through the blender.

Skirt steak marinade

The colors in this marinade are incredible. Clearly I got carried away and took a few photos.

Skirt steak marinade

Now pour it over the flank steaks a few hours before you plan to cook 'em. There's a lot of seasoning going into this one, so you don't need to marinate for long.

Skirt steak marinade

Ok. Now you wait. And make some of the sides. Like guacamole, beans, and onions. And salsa. And hell, make your own tortillas. You can make them an hour in advance, and they keep beautifully. And they're easy! We also grill poblanos. You just toss them on the grill next to the meat for a few minutes, until the skin turns black. Toss them in a paper bag to steam in their own heat for a few minutes, and peel off the skins. Yum! And mix the seasoning blend.
1/4 cup mild chile powder (like ancho)
1 1/2 tsp coarsely ground fresh black pepper
1 1/2 tsp kosher salt
After you've marinated for a few hours, light the grill by whatever your favourite means are. You're going to need a screaming hot grill. Pull the meat out, pat it dry, and sprinkle the seasoning blend all over the meat, rub with a bit of canola oil, and put the flank steak on the grill. It's already going to be looking crazy delicious. While the grill's heating up, make the resting butter, a mixture of:
8 tbsp melted unsalted butter
1/4 cup finely chopped cilantro
1 tbsp fresh lemon juice
4 garlic cloves, zested
1 tbsp oregano
1 tbsp crushed red pepper flakes
Put a bit of canola oil on the outside of the steaks, then sear them 2 minutes on a side.

Skirt steak

Pull them off the grill, and brush them with the resting butter. Put back on the grill, close the grill and cook for 2-5 minutes for rare to medium.

Let rest for a few minutes on your cutting board, then slice thinly for fajitas. Serve with all the guacamole, onions, poblanos, beans, salsa and fresh tortillas from above.

It's a bit tricky to get everything made at once, so I made the guacamole, beans and salsa several hours earlier, made the tortillas an hour in advance, and did the onions while I made the steaks.

These are the tastiest fajitas I've ever made.

Skirt steak

Enjoy them with some friends soon.

26 July 2009

Crêpes

Cooking in other peoples' homes is always exciting. You don't know how their stove handles. You don't know where they keep the sugar, or the vanilla. And most excitingly, you don't know how often they replace stuff.

I was recently visiting my in-laws for the 4th of July, and did some of the cooking there. For breakfast, one morning, I thought I would make pancakes. Quick, easy, yummy. I mixed up a simple pancake batter, and was surprised by the consistency of it. Generally, my pancake batters are like a thick soup with lumps in it. This was more of a runny soup with lumps in it. But I normally make buttermilk pancakes, so I chalked it up to that. I fired up the stove, and got a pan screaming hot, and poured a ladelful of batter into the pan. It still looked like runny soup with lumps. I tossed a couple of blueberries into the batter, but I wasn't hopeful. This wasn't going to end well. The pancake didn't rise. And didn't rise. And didn't rise. I flipped it. It was wafer thing, and the blueberries were holding it up on the other side. My first thought? The baking powder must have gotten a bit old. I picked it up and looked underneath:
Best Before Jan 2003
Oh. Well, crêpes don't require baking powder. Let's make crêpes instead.

Crepe batter in mixer

I lived in a French-language dorm when I was a college student. It was in the very small francophone region of Edmonton, Canada. Every Sunday morning, several of the Catholic francophone girls there would make breakfast, and they would often offer to serve breakfast to anyone who was up. This recipe for crêpes came from one of these girls. It was one of the first things I knew how to cook. In those days, she said do 1 recipe/person you're serving. Now that I'm not 19 anymore, that seems like craziness. We'll make 2 x of this recipe for 2 adults and a famished 3-year old, and still have plenty of leftovers.
1 ½ cups flour
2ish cups milk
1 tsp vanilla
1 egg
Crepe batter

Beat egg. Add milk. Pour a small amount of this into the flour and mix into a paste (you don't want lumps in the final batter). Now mix in the rest of the milk/egg mixture. Add vanilla.

Get a pan medium-hot. Melt some butter in there. Pour in a ladleful of batter into the pan, it'll be pretty runny.

Pouring crepe

Cook for about a minute, until the liquid batter turns mostly solid. It'll look a little more cooked than this:

Cooking crepe

The center will still be a tiny bit liquidish, but the outside will be solid. Then flip with a spatula. Cook for another minute or so, then pick up the crêpe with the spatula, and start another one. Once you get comfortable with this, you can get a couple pans going simultaneously, and be ploughing through these pretty quickly.

Single crepe

Don't worry if the first one looks messed up - even the francophone girls who taught me how to make these gave the first crêpe "à Dieu".

Serve these with fruit, whipping cream, icing sugar for dusting and *real* maple syrup - these are francophone Canadian, after all - you wouldn't sully them with that crappy fake syrup, would you? We tend to put bowls of fruit in the middle of the table, and let people roll their own.

Crepes

For pure decadence, eat these outside on a beautiful summer morning. Yum.

23 July 2009

Basil pesto

One of my first experiences where I can remember being really impressed by an exotic, new food was about fifteen years ago. The scientist who had hired me for the summer had all of her students over for dinner one evening, and one of the things she made was a cold basil pesto salad. I was enthralled. I'd never eaten fresh basil before, and was bowled over by the flavour.

Basil

When I returned to university in the fall, I thought I would impress my new love interest with my new culinary skills (until that point I really didn't cook, but I was ready to showoff anyway). I dug out the copy of Joy of Cooking my mother had given me (the original version, not the travesty that Ethan Becker made) and was delighted to find a recipe for basil pesto. However, the small grocery store near my 350 square foot basement apartment didn't carry fresh basil. Being a resourceful lad, I merely bought the largest bag of dried basil I could get, and made pesto with that. Imagine my surprise when I finished the final step, and the "pesto" turned black. My date would be arriving in a few minutes, so to rescue the evening, I turned off the lights, laid out a blanket on the floor, lit a candle, and had a romantic, gray basil pesto dinner. My date that night was very polite.

I still make that recipe, but now I use basil from the pot in the backyard (to ensure that I'm never desperate for basil). And these days, I usually just wing the proportions. But tonight, I'll give you the original Joy of Cooking basil pesto, for old time's sake:
1 ½ cups fresh basil leaves (yep, it definitely said fresh in that old book)
2 cloves garlic (I tend to use quite a bit more)
¼ cup pine nuts
¾ cup parmesan cheese
¾ cup extra-virgin olive oil
Pesto

These days, making this recipe is quite easy. Just put everything but the oil into the food processor, and grind into a fine paste.

Drizzle the oil in slowly while running the food processor. Remember, you're trying to make an emulsion, so don't add the oil too quickly...

Basil pesto

Toss pesto in with hot pasta to taste. You can keep extra pesto in the fridge for a couple weeks (pour a bit of oil on top to "seal" it in, and it'll keep that nice bright green color - otherwise it'll oxidize and turn a darker green/brown colour that's less appetizing).

On the most recent night we made it, we served it with the only noodles we had in the house - macaroni. And it was delicious.

Pesto pasta

21 July 2009

Orange blossom and drunken cherry ice cream

I recently discovered orange blossom water. It smells great. I think it would make a lovely, inexpensive perfume. But the strength of the smell of it makes it seem a little odd to put in food. It's too - perfumey - to seem like something you'd like to eat. But I'm here to tell you to use this stuff. It's great. I've adapted the drunken cherries with orange blossom chenna that I made previously into an ice cream. And it's a resounding success, if I do say so myself.

After discussing with my friend Dr. Ricky, I decided to start this recipe by making an orange zest extract. If you bought this straight from Absolut, they would no doubt call it Absolut Zest, or Absolut Microplane. Or something.

For 1 quart ice cream, use the zest from:
1 ½ oranges
4 ½ tbsp vodka
Soak overnight, then press through a fine sieve to get out the orange zest chunks.

Orange zest vodka

Save this for later. While it's soaking, you can prepare the custard.

For 1 quart ice cream:
1 cups milk
¾ cup sugar
1 ½ cups heavy cream
½ cup mascarpone cheese
pinch salt
6 large egg yolks
2 tbsp vodka/orange zest infusion (Absolut Zest)
2 ½ tbsp orange blossom water
1/3 cup pistachios
Heat the milk, cream, sugar and salt. Get them nice and warm, stirring constantly, to around 140°F (a kitchen thermometer is inexpensive and will make all of this much easier - so I recommend you get one). Meanwhile, beat the egg yolks into a foamy mess. Slowly pour the warm milk mixture into the beating eggs. If you get this right, you get an emulsion, and increase the odds of getting a custard instead of scrambled eggs. If you're worried about getting this wrong, add the first few bits of hot milk a ladelful at a time. It's less important to go slow as you add more milk, so only the first few ladelfuls need to be done super slow.

Emulsion

When this is all mixed, put back on the stove and heat slowly to 175°F. Stir constantly with a flat-edged spatula so that you're scraping the bottom of the pot.

Custard

As soon as it hits 175°F, take it off the stove, and put it into a separate container to stop the cooking immediately. *If* you get this wrong and it starts to curdle, you can still stop the cooking and run an immersion blender through it. It's not ruined if you stop it as soon as you see signs of curdlage. Okay. Now put this custard in the fridge and chill overnight.

Shell the pistachios and chill them so they'll be ready for the big day.

Four to six hours before you're ready to run the ice cream through the ice cream maker, start making the drunken cherries:
1 lb cherries, stemmed, pitted, and quartered
1 tbsp sugar
1 1/2 tsp balsamic vinegar
1/2 vanilla bean, split lengthwise
4 tbsp sake
Cherries

Scoop out the yummy smelling vanilla seeds, mix all the ingredients, and refrigerate. Every hour, go in and mix them up a bit. If you let this mix sit too long you'll have cherry soup instead of solid cherries.

At ice cream time, mix the mascarpone cheese, the absolut zest and the orange blossom water into the custard. Run this through your ice cream maker as per your instructions (mine took about 20 minutes to set). Right at the end, fish the vanilla bean out of the cherries. Toss the pistachios into the ice cream maker, then pour in the cherries and cherry juice.

Shut off the ice cream maker as soon as you've added all this good stuff, and pour the whole mixture into a container and toss it in the freezer to harden up.

Ice cream

This is delicious! Fruity. Bright. Fresh. The perfuminess of the orange blossom water mellows properly in the fat of the cream. Really, really tasty. And it loses the texture issues that its forbear has. This was really fun to make. Perhaps the only way this could be better is to make the cherries a bit smaller (as they freeze pretty hard). Yum!

20 July 2009

Black Beans with Chipotle and Tomato

Beans

This blog isn't all meat, all the time. We also do a wee bit o' veggie cooking. For example, this brown bean concoction from Vegetarian Cooking for Everyone. (This book is fantastic for veggie sides to your big hunk o' meat, and for weeknight veggie cooking). To serve with Mexican cuisine, we make black beans with chipotle and tomato.
1 tbsp oil
1/2 onion, finely diced
1 28 oz can black beans
1 tsp chipotle chile
1 cup finely chopped roma tomatoes
4 cilantro sprigs
salt
garnish: chopped cilantro, jalapeno
Sautée onions in hot oil until soft (3-5 minutes). Add everything but garnish, simmer for half an hour or so. This is an easy addition for Mexican cuisine, for folks who look forward to the bean portion of the meal.

18 July 2009

A lazy Saturday calls for...

...mint lemonade! A very nice Saturday afternoon.

Lemons

I found this refreshing drink over on Desert Candy. It's quick, easy, delicious and just a tiny bit exotic. My minor modification of her recipe:
fresh juice of 8 lemons
1 cup simple syrup (50/50 water and sugar, heated until sugar is dissolved)
6 cups water
1/3 cup fresh mint
Juice the lemons, fish out the seeds, add the mint. Run through a blender, sweeten with simple syrup (tasting along the way, to ensure you won't oversweeten), then do the same with the water. Serve over ice. Everyone will *love* it.

Mint lemonade

16 July 2009

Sweet Sauteed Onions

How many recipes do you have to cook from a book before you declare the book a *raging* success? I'm just about there with Adam Perry Lang's new book Serious Barbecue. I've already made a modification of his brisket. It was freaking fantastic. And now I've done his fajitas, which I will post on shortly. As an accompaniment to fajitas, I've made his sweet onions. They go great on fajitas, on burgers, and most recently on grilled bratwurst. I think you'll agree they're pretty outrageous. All right, let's go!
1-2 sweet white onions
3 tbsp extra virgin olive oil
1 tbsp fresh thyme leaves
1 tbsp granulated sugar
1 tsp kosher salt
1 tsp finely ground fresh black pepper
2 tbsp unsalted butter
6 garlic cloves, zested
2 tbsp red wine vinegar
Peel and slice the onions to make rings. Sautée the onions in oil. As they soften, add the thyme and sugar. Continue as the sugar melts, browns, and covers the onions. This is yumminess here. Add garlic, salt and pepper. And butter on one side of the pan (until it melts). Mix all of this delicious ridiculous mess. When the onions are soft and browned, deglaze the pan with the vinegar. Set aside and keep warm for the fajitas/burgers/bratwurst.

Sweet onions

I think you'll agree these look and taste crazy good.

14 July 2009

Buffalo Tri-tip

Raw tri-tip

Here's a new one. Tri-tip is a loin steak cut that in most parts of North America gets turned into ground beef. In California, it's very popular salted and grilled. We'd never had it before, so when I was browsing for my weekend hunk o' meat and saw a buffalo tri-tip, you know I had to get it (even though it wasn't the bright red I might hope for, it still looked exciting - I'm not sure if that's because it's buffalo or because it's a day or two old).

Tri-tip gets its name from its triangular shape that tapers off to a point. This is a perfect cut of meat for families that want their steak cooked differently, as that tapering shape allows some parts of the steak to be medium-rare while the other end is medium-well.

Well, given that I've been test driving Adam Perry Lang's Serious Barbecue, I decided to use the buffalo tri-tip in a modification of Lang's tri-tip with honey-garlic glaze. Here we go:

This book uses multiple flavour layers on the different meats. This recipe has a paste, a seasoning powder, a glaze and a finishing dressing. Oh yeah, baby!

Tri-tip seasoning paste

Start with the paste:
¼ cup mild chile powder - I used a mixture of ancho and chipotle - yes, I know chipotles aren't really mild, but I ran out of ancho, and we don't mind spice here.
1 tbsp Worcestershire sauce
1 tbsp soy sauce
1 tbsp beef bouillon (he calls for beef base paste, but I haven't gotten any yet, so I use the cheap stuff)
Thirty minutes before cooktime, mix that goop into a nice paste, as shown above. And now massage it into the meat. It'll take a couple minutes, but it'll make a nice schmear all over the surface of the meat.

Tri-tip covered in paste

Now the seasoning powder:
2 tsp garlic powder
1 tsp kosher salt
1 tbsp lemon pepper
1 tbsp coarsely ground fresh black pepper
1 tsp cayenne pepper
Oh yeah! More pepper!

Tri-tip seasoning

Now sprinkle that good stuff all over the paste on the meat.

Tri-tip seasoned

Now let the meat warm up a bit. For steak, given that you won't be cooking that long, you don't want the pink parts to be cold, so I let it warm up for about half an hour before cooking. Meanwhile, prepare the glaze.
2 tbsp apple cider vinegar
1 tsp crushed hot red pepper flakes
¼ cup apple juice
½ cup honey
1 tbsp Worcestershire sauce
5 garlic cloves, chopped finely
4 tbsp butter
Heat all the parts of the glaze in a pan for a few minutes, just long enough to melt the butter. It'll make a completely disgusting-looking shouldn't-ever-be-photographed mess. Kinda like this:

Buffalo tri-tip glaze

That's congealed bits o' butter in there. Yum! Julia Child would be proud! (Fun fact - the word butter appears nowhere in the Wikipedia's Julia Child page. For shame!)

Okay. So get your grill screaming hot, but only on one side. You're using direct AND indirect heat today. Place the pasted and seasoned buffalo tri-tip on the grill, and sear both sides - about 2 ½ minutes per side.

Tri-tip on grill

After you've seared both sides, slide the meat over so that it's not directly over the fire, and paint it with that yummy glaze. Close up the grill, and cook with indirect heat (photo below is from right before moving it to indirect heat).

Finishing the tri-tip

Now cook the meat for 10 minutes with the lid closed. Meanwhile, make the finishing dressing:
½ cup extra virgin olive oil
1 tbsp lime zest
1 tbsp lime juice
¼ cup finely chopped chives
fleur de sel
At the end of the ten minutes, open up the grill and reapply the glaze. Close up the grill one more time, and cook 6 minutes for rare, 7 minutes for medium and 9 minutes for well-done (adjust as per heat of your grill). Remove from the grill, and let rest on your cutting board 5 minutes or so. Paint on the finishing dressing, sprinkle on the fleur de sel, slice and serve.

Our good camera ran out of battery juice, so I only have this shot of the tri-tip:

Medium tri-tip

It was DELICIOUS. Tender. Juicy. Spicy. My wife says she need never have another kind of steak. And it's a pretty cheap cut of steak (the buffalo tri-tip was only $5 a lb, I imagine beef would be even cheaper). This is an easy preparation, if I'd had the spices mixed ahead of time, we could have even prepared this dinner after work and still had time to get our 3-year old in bed.

Highly recommended.

Served with:
The Zin with the tri-tip

12 July 2009

Indian Chai

Chai

You've probably had chai, before. Bitter, bland with a mild scent of allspice, it's truly appalling stuff as imagined by the likes of Starbucks or steeped out of the little, flavourless teabags of Bigelow. This is not that chai.

No, this chai recipe was smuggled out of an Indian restaurant in the Bay area of California, then handwritten by a close friend who guarded it for years. For years, she shared the chai with us when we visited, and we would gulp it greedily. Indeed, some of my fondest memories of Houston are of sitting in her kitchen while talking and mainlining chai. This is good stuff, bright, sweet and complex. It's simply delicious.

When we left Houston, we begged the recipe from here. And I present it here:
4 C whole milk
2 C water
3 tbsp sliced ginger (or ½ tbsp powder)
2 tbsp mashed green cardamom pods + 2 shakes cardamom powder
20 cloves
1 ½ tbsp dried basil
1 tbsp cinnamon
½ tsp lemongrass
½ tsp fresh black pepper
1 ½ tsp vanilla
4 tsp Assam looseleaf tea
9 heaping tsp sugar
Prepare the spices.

Chai spices

Mix them with the milk and water and bring to a light boil. Add the tea, and boil gently for two minutes. Now strain out the spices. (Note, leaving it to settle for a few minutes after sieving is useful to get some of the spices to settle out, as a slight sludge will form).

Straining chai

Add the sugar and vanilla, and stir in. Serve in large mugs. Huge, even. Large servings are completely appropriate here. And anything you don't drink while hot, will be great over ice.

Pot of chai