30 June 2009

The Power of the Googles


Blogging really is, at least on some level, an ego trip. I admit it. Hell, I revel in it.

I use the nifty tools that Google Analytics makes available for bloggers to look and see where people are who are reading my blog. What fun! I've got a returning reader in Pakistan! I've had readers in Belgium and Germany who looked at more than one page! Ah, the power of the internets. But most interestingly, I can see which Google search terms resulted in people clicking through here. And I find that fascinating. So in the same style as Jenni Field at Pastry Methods and Techniques, I bring you the search terms folks have used to find me, interpreted into a question (if I can) and my answer.

1) Do you have a lazy margarita recipe?

I think you're asking for an easy margarita recipe. Ask, and ye shall receive. A classic margarita recipe that takes very little time to prepare.

2) Do you have a habanero pineapple recipe?

Why yes. Yes I do.

3) If you're using frozen rhubarb to make a pie, should you thaw it?

No. No, don't ever thaw rhubarb for pie. Like most frozen fruit, it'll turn into soup when it thaws. Use the frozen rhubarb, but bake it longer when you're making the rhubarb pie.

4) How do you bbq pizza using indirect heat?

As it happens, I have a recipe!

5) Is limp rhubarb okay?

Yes. It makes me sad to see limp rhubarb, but you can still use it to make quite lovely pie. Just cut off any brown parts.

6) How do you slow cook wild boar over indirect heat?

Well, I guess you would use normal indirect heat techniques. I've never cooked wild boar, but basically, any meat you're cooking... Start the fire on one side of the grill, put the wild boar (dead, preferably) on the other side of the grill, and cook until done. In all seriousness, it depends on the cut. But drop me a line if you have a source for wild boar.

This has been the first installment of the power of the Googles. See you next time!

29 June 2009

Drunken cherries with orange blossom chenna

The classic dessert to serve with a bbq brisket is pie. And I do appreciate classic combinations. But I've never felt restricted by them.

I've been fortunate to work with people from all around the world. As a result, I've been exposed to all kinds of fun food that I might not have sought out otherwise. I've become a fan of Asian-style desserts. They're not super sweet. They often accomodate quite different flavours from European desserts. Rice cakes. Mochi. Sticky rice. So recently, I purchased The Sweet Spot: Asian-Inspired Desserts by Pichet Ong. It's full of all kinds of fun stuff, including some pretty creative desserts.

With my most recent brisket, I served drunken cherries with orange blossom chenna from this book. Chenna is an Indian-style cheese curd. And as a cheese curd, I expected it to be relatively bland, and an excellent base to paint flavours on. I couldn't find chenna in the Indian markets in San Diego, so I chose to make it. Basically, you mix acid with milk to precipitate the milk while heating.

I combined two recipes I found out in the wilds of the internets. I wanted the milk to be relatively neutral flavoured, so I didn't use vinegar or lime juice as the acid. I used buttermilk.
2 quarts milk
1/2 quart buttermilk
Heat the milk to 170ºF. Add the buttermilk, and heat to 185ºF. Hold at 185 for 15 minutes, stirring regularly.

Milk to chenna

The milk will curdle, forming large chunks. At the end of the 15 minutes, pour the mixture over a colander lined with cheesecloth. Let drip dry.

This is chenna. In Canada, it would be called dry cottage cheese. In Pennsylvania, farmer's cheese. But basically, it's an unflavoured cheese curd. Now we're going to flavour it.
1 1/3 cups chenna
1/4 cup plus 2 tbsp sour cream
1/3 cup sugar
2 tbsp orange zest plus more for garnish
2 tsp orange blossom water (you can get this in Middle Eastern markets for about $2 - an in places like Whole Foods for $10)
1/2 tsp salt
Mix all these ingredients together and place in the fridge to meld.

Orange blossom chenna

Meanwhile, make the drunken cherries.
2 lb cherries, stemmed and pitted
2 tbsp sugar
1 tbsp balsamic vinegar
1/2 vanilla bean, split lengthwise
1/4 cup sake
1/4 cup shelled unsalted pistachios
Scoop out the guts of the vanilla bean, and rub that good stuff into the sake. Drop the bean in, as well. Mix everything. Shake it up a little, and put it in the fridge to soak for 4-6 hours.

Drunken cherries

Now you'll have a delicious cherry goop.

Toast the pistachios for a few minutes. Split the chenna into 8 bowls. Fish the vanilla bean out of the cherries. Spoon the cherries on top, and toss the toasted pistachios on top of that. Sprinkle the garnish orange zest. Serve immediately.

Orange blossom chenna with drunken cherries

This. Was. Delicious.

The cherries were crazy good. The over-powering perfuminess of the orange blossom water has mellowed down to a beautiful, mellow citrus flavour that melds beautifully with the cherries and vanilla. What a fantastic dessert.

My only complaint - and a complaint of the folks I had over for dinner - the texture of the chenna wasn't a fabulous dessert texture. I'll be reinterpreting this as an ice cream in the future. It's truly an amazing dessert. Stay tuned for that.

27 June 2009

A lazy Saturday calls for...

a chocolate martini! This is my wife's favourite cocktail.
2 oz vodka
1 1/2 oz crème de cacao
good-quality cocoa powder
Hershey's hug or kiss
Rim the glass with vodka and then the cocoa powder, then place your Hershey's hug into the glass. Shake the vodka and crème de cacao with ice. Pour and serve.


Chocolate martini

25 June 2009

Pig's feet with caramelized onion

Shortly before we left Baltimore to move to California, some very close friends had us over for a farewell dinner. They served this magical thing, pig's feet on crackers, that was just one of the best things I've ever had. Rich, salty, smooth and full of flavour. I fell in love. Within days of arriving in San Diego I had ordered the recipe book from Amazon.com. Pork and Sons. Go and get it. Now.

Cooking French-style pig's feet is just like barbecue, in that you're using an inexpensive cut of meat, and using slick technique to turn it into something magical. And while my wife forces me to tell everyone I serve this to what's in it, most of them *love* it.

So, on to the list:
4 pig's feet
3 oz smoked slab bacon
2 brown onions
1 carrot
1/2 leek
1 bunch fresh parsley
2 bay leaves
1/2 cup walnut oil
1 tsp brown sugar
1 tbsp balsamic vinegar
1/2 red onion
fresh chives
fleur de sel
coarsely ground black pepper
Clean the pig's feet. Put the feet into a decent size stockpot. You're going to need a big pot. Pig's feet are big. Toss in the bacon, 1 onion, the carrot, leek, parsley and bay leaves. Top up with water and set it on the stove.

Pig's feet

Boil this bad pot o' feet for 3 hours. Pig's feet are tough, and need some hard core heat for a while.

Turn off the heat and fish out the pig's feet and the slab bacon. You're going to need to pull the meat off. It's nasty business. Best to send anyone with a weak stomach out of the room for this part...

Pig's feet, post-boil

Separate the meat from the bones and cartilage. You're going to keep the skin, the meat, the fat, the bacon and basically anything that's gooey. It's all edible. It's all yummy.

Now run all that meat through a coarse meat grinder, or chop it by hand. Pig's feet has a lot of gelatin in it, so this is greasy, wet work. It'll get on everything. Yum! You may have to pass parts of it through the grinder twice to remove the larger chunks.

Pig's feet coming out the meat grinder

Meanwhile, sautée 1 chopped brown onion in walnut oil.

Sauteed onions for packing into pig's feet sausage

Pack the brown onion into the ground meat, season with salt and pepper and form them into sausage shapes. Wrap them in plastic and chill in the fridge for a few hours or overnight.

Pig's feet packed into sausages

Meanwhile, chop the other brown onion, and sautée in walnut oil. When the onion starts to brown, add brown sugar, and cook until the brown sugar caramelizes and turns dark brown on the onions. Set the onions aside.

Chop the chives and purple onions, and set aside. Mix walnut oil with balsamic vinegar in about a 2:1 ration (oil:vinegar).

When you're ready to serve, slice small slices of of the sausage and prepare to place into the broiler. Drizzle the oil:vinegar mixture onto the sausage, and place in the broiler. Brown under the broiler. When browned, place the sausage slices on a cracker. Sprinkle on the caramelized onion, the chives, purple onion and fleur de sel. For God's sake, don't forget the salt. You need the big salt crystals to hit your tongue simultaneously with the meat to get the right effect.

Serve hot. Be prepared for people to go from "Gross!" to "Holy crap this is great!" in seconds.

Pig's feet ready to serve

22 June 2009

Indirect Heat's Home Smoked Brisket

When I first moved to Texas from Canada twelve years ago, I had a Canadian's conception of barbecue.  Bbq is burgers.  Hot dogs.  On a day you're feeling fancy, bbq is steak.

In Texas, barbecue is only when you're using indirect heat, low and slow, over hours and hours to break down the meat.  In Texas, brisket is the king of barbecue.

Brisket is a rather nasty cut of meat.  It's tough.  It's fatty.  And it takes a damn long time to break down the fat.  

Pre-rubbed brisket

Brisket is very high in collagen, a connective tissue that holds meat together.  It takes a long time to break down collagen so that the meat is a nice consistency.  If you do this at a normal meat-cooking temperature, by the time the collagen has broken down you'll have a brisket biscuit.  Yuck.  So instead, we cook the meat low and slow, to allow the collagen to break down.  The real trick is to do this without drying out the meat too much.  A good brisket harnesses indirect heat in the best possible way.  As far as I'm concerned, brisket is quintessential barbecue.  Cook it low (low temperature) and slow (long, loooong time on the bbq) and it will fall apart beautifully, and better than even the highest quality cuts of beef.

I have an old-standard brisket that I make pretty regularly.  I will not be writing about that today.  Rather, I recently cooked a modification of a new recipe for brisket, from Adam Perry Lang's new book, Serious Barbecue. 
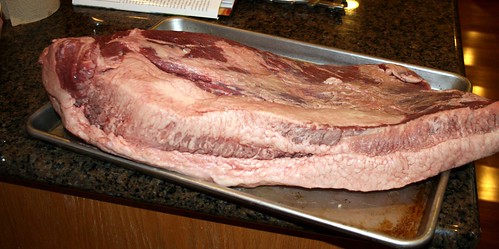
Get yourself a decent sized brisket.  Outside of Texas, you'll need to go to a butcher, and explain what you want.  In Maryland I had to special order brisket.  In San Diego, there is one place that cuts the briskets the way I want, Iowa Meat Farm.  I like to do them big, up to 16 lbs.  The bigger it is, the longer you can smoke it before it dries out.  Certainly anything smaller than 10 lbs is too small to properly smoke.  Get up early.  If you're serving brisket for dinner, you'll need to be lighting the fire around 11 hours before you serve it (for us, around 7 a.m.).  So get up, pull the brisket out of the fridge and then light the charcoal on your grill.  While you wait for your grill to heat up, make the paste:
5 tbsp ancho chile powder
3 tbsp dijon mustard
3 tbsp beef bouillon
Brisket paste

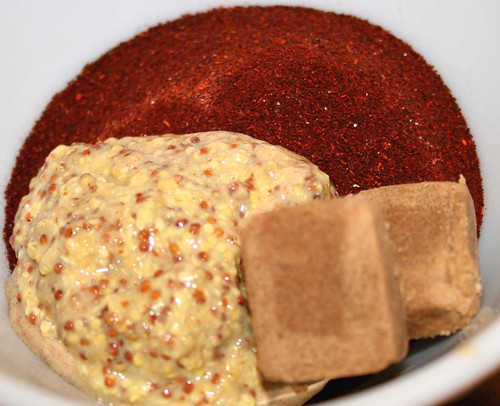
Mix the ingredients into a nice, goopy paste (add a tiny bit of water to make it easier to rub if necessary).  Now massage this into the brisket.  I've read about massaging meat before, this is the first paste that I really felt like I really needed to work it in.  Indeed, my wife asked me if I needed time alone with the brisket...

Massaging the meat

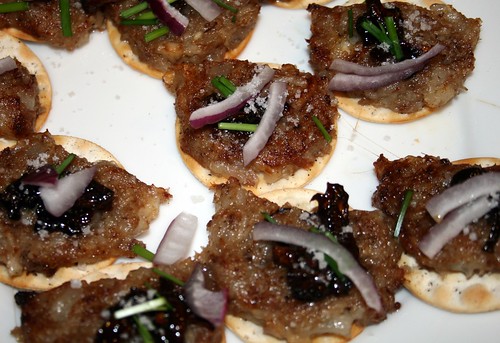
Tell me that doesn't look incredible!

Now, the next step is to make the seasoning:
1/4 cup garlic salt
3 tbsp coarsely ground black pepper
2 tbsp chili powder
1 tbsp lemon pepper
2 tsp kosher salt
3/4 tsp cayenne pepper
Seasoning blend

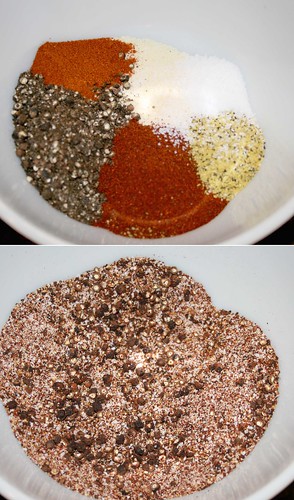
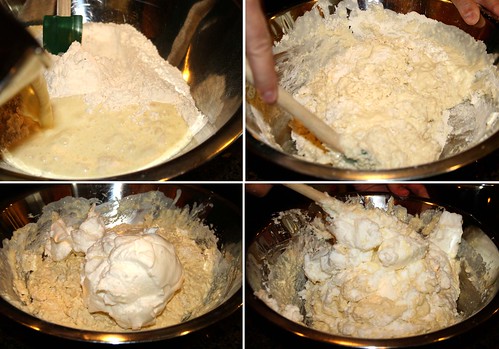
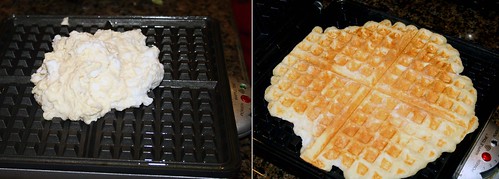
Sprinkle that lovely stuff all over the meat.  The paste will help it stick.  Now take a breather, and leave the meat to warm up for an hour or so.  Gives you enough time to make breakfast for your family.  Try waffles.  

Towards the end of the hour, move the charcoal over to one side of your grill.  You don't want your brisket anywhere near that heat.  You're going to have a pile of screaming hot coals on one side of the grill, and a brisket on the other.  The real trick to bbq is judging how your grill holds the heat.  How much charcoal you need to warm it up, how often you need to feed the fire.

Close your grill, and warm it up to 225 F.  You want to hold it around 225 the entire cook.  In the beginning and the end is the hardest.  In the beginning, because you have a 16 lb heat sink that's absorbing heat, in the end because the fire is smothering itself in 12 hours of ashes.  Now gently brush the brisket with canola oil, and place it on the grill, fat side up, away from the heat.  You want indirect heat for your brisket.  This is the magic of indirect heat.

Keep the grill closed as much as possible.  When you open it, feed the fire as quickly as possible, and even don't open the lid fully to add charcoal.  Each time you open it, you're letting precious heat out, and giving another 15 minutes to heat up the grill.  Soak mesquite wood chips (really, you want mesquite for brisket) and add them every time you open it to add the mesquite flavor.  And wait.  And wait.  And wait.  You're gonna have that brisket on there basically all day.  You've got time to read a book.  Play video games.  Play bocce with your kids.  And prepare other dishes for dinner.

While you're waiting, you might as well make barbecue sauce:
1/2 cup canola oil
5 garlic cloves, chopped
1 onion, chopped
1 green bell pepper, chopped
2 tsp salt
1/4 cup bourbon
3 tbsp chili powder
1 tbsp coarsely ground black pepper
1/4 tsp allspice
1/4 tsp cloves
1 cup dark brown sugar
2 cups water
2 cups ketchup
1/2 cup molasses
1/2 cup dijon mustard
1/2 cup apple cider vinegar
2 tsp hot sauce (I used sriracha)
1/2 cup apricot preserves
1 jalapeno chile, grated
1/2 Granny Smith apple, grated
Sautée the onions, garlic, pepper and salt in the oil until lightly browned and the onions are translucent.  Pour in the bourbon.  This is the best part, cause the whole kitchen will smell like bourbon while you reduce the sauce.  After most of the bourbon has boiled off, add the spices, and sautée for a few more minutes.  The whole kitchen will now smell absolutely ridiculously amazing.  
Preparing the sauce

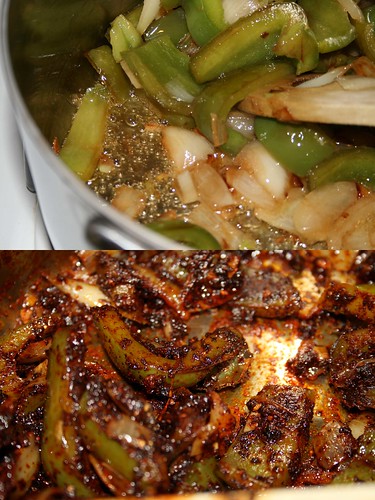
And it'll start looking pretty ridiculously yummy, also.  Cook for a few minutes, but this stage must come to an end.  Add everything else.  Boil for an hour or so to reduce the sauce, and adjust seasoning to your taste (if it were just for me, I'd dial up the heat a bit, but most of our guests don't like heat the way I do, so I left it as is).
The sauce

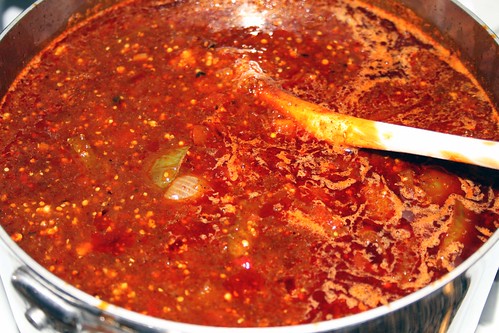
When it cools a bit, run it through a blender, or work it a bit with your immersion blender.

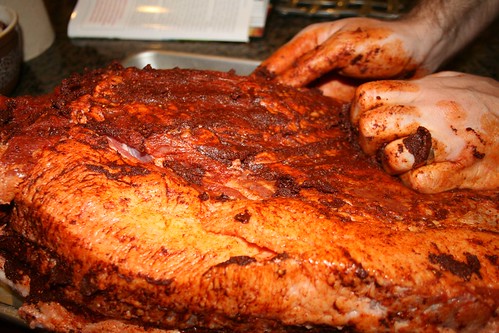
Okay, back to the brisket.  Over the 11-12 hours you cook it, it should darken.  Even blacken.

Don't freak out.  The blackening doesn't indicate burning of your brisket, just darkening of the spices on the outside of the brisket.
Brisket before and after

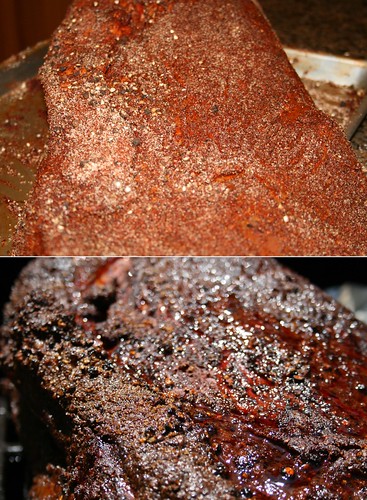
The magic of indirect heat will transmogrify your meat into a beautiful brisket.

The way you can tell it's done is that when you poke a bbq fork in it, you won't be able to properly pick it up.  It'll start to fall apart, rather than pick up.

Take it off the grill, bring it in the kitchen, and let it rest for 20 minutes to half an hour.  Otherwise, when you cut into it, you'll be cleaning juices off the floor.  You need the juices to congeal a bit.
The final brisket.

Slice it against the grain.  Serve with the bbq sauce on the side (really, Texans will thank you for this).

But the one tradition that you have my permission to break?  Crappy Wonder Bread.  In traditional bbq in Texas, it's served with a slice of the nastiest white bread on earth.  They say it's necessary.  I say it's nasty.

Serve it with whatever you need to, but leave out the Wonder Bread.

19 June 2009

Wine in San Diego

There's a new business model in town.  The Splash wine bar, which is a relatively new place, has an interesting setup.  When you walk in, you'll notice chairs around the outside of the room, and several large machines with wine bottles in them.  You approach the bar at the back end of the room, and buy a card for wine (a flat dollar amount).  Then, you can buy a splash (about one ounce) of wine in your glass by putting the card into a machine and placing your glass under the spout of the wine you want to try.  The prices range from around a buck a splash on up.  Any of the wines are available by the bottle, and many are available by the glass.

This is a pretty fun business model.  You can try a dozen different wines in a short amount of time.  And many of these are wines you might feel more nervous to buy an entire bottle of (given that you can buy an ounce of $100 a bottle wine, it becomes easier to sample wines that you're less likely to purchase).  There are some really fabulous wines served here.  Indeed, we walked out with a bottle of 10 year old Porto Kopke that was fantastic.

The downside of this little place is that having to get up after an ounce of wine to get more kind of kills conversation.  You end up wandering around the room exploring the wine, passing your friends exploring the wine, but there are too many interruptions to be a good place to talk.  The other downside is that if you're like me, and you like wine, you can blow a lot of money really fast.  Fortunately when we went, we had dinner reservations, so we only spent an hour there.  That was perfect.

Will we go back?  Hell, yes.  It's a fun way to try wine, and a great way to get a few bottles for your home.  

16 June 2009

Father's Day gifts.

In our house this year, Father's Day is about Father.  i.e., me.  So I'm going to smoke a brisket.  There's nothing more relaxing to me than tending a fire, and checking in on a giant slab of meat over the course of a day.  It will leave me time to have a beer (or two), to read a book (or two) and to play hockey with my 3-year old in the den.

I don't think I'm the only guy that looks forward to Father's Day as a day of meat and grilling.  So, if you don't mind, I'm going to make a few suggestions for Father's Day gifts for the meat-lover in your life that are really great resources, but that don't get the publicity of some of the more famous chefs and bbq enthusiasts.

First, up.  Pork and Sons.

This beautiful little book suggests all the fun French ways you can cook pork.  It has a particularly magical recipe for what to do with pig's feet.  I'll write about this some day, but suffice it to say, you boil the crap out of them, shred the meat, pack it into sausages with fried shallots, and pack them into sausage shapes to harden.  Broil slices of the resulting sausage, and serve slices on crackers.  And watch the faces of your loved ones (who will no doubt claim that they're not that into pig's feet) go from cautious to rapture.

Second up is my go-to bbq book.  This one has everything, and the worst recipes in here are merely good.  

I bring you Smoke & Spice.

I've already written about the beef tenderloin in here, and plan to do posts on some pulled pork and whole chicken preparations in the future.  This book is all yummy all the time.

My final meat book for you is my cured meat bible, Charcuterie.

I confess, I have experimented less with this book than with the other two.  But this book is worth it for the bacon recipe alone.  As everyone knows, bacon is pure yummy.  Home-made bacon is to grocery store bacon as a Porsche is to a Honda.  It's the stuff, and if you have a smoker, it's really very little time investment.  

All 3 of these books are fantastic references, and guaranteed to keep you in delicious meat.

Good luck with your last minute Father's Day shopping.

15 June 2009

Bbq & Waffles Go Together Like...

Waffle iron

On bbq day, I'm generally up pretty early.  Brisket can take as long as 12 hours to cook properly, so unless you want to be eating dinner late, an early start is required.  So after I get the meat out to warm up, and start the fire, I might as well make a nice breakfast.  How about buttermilk waffles?  Waffles are all technique, no ingredients.  The only thing you should need that's not in your pantry is the buttermilk.

Good waffles use the magic power of eggs.  Eggs are awesome.  And understanding how awesome they are is what makes working with them easier.  Egg yolks have the power of emulsification.  Emulsions are cool, so let's talk about them for a bit.  If you mix oil and water in a measuring cup, the oil will float to the top and you'll have two layers.  The oil layer.  And the water layer.  Emulsifiers make it so that you can get one homogeneous mix of oil and water.  Dishwashing detergent does this, but doesn't taste good enough to put in waffles or custards.  Egg yolks can also do this.  The trick is to add the oil to the yolks slowly, so that the yolks can coat the oil and suspend it.  So you beat the egg yolks until they're nice and yellow and yummy looking homogeneous mess, and then slowly add whatever you're suspending.  In the case of waffles, it's buttermilk and butter.  If you've done it properly, you'll get a liquid that's the same consistency throughout.  If you've done it wrong, the butter will float to the surface.

Alright, so on to the waffles.  I use the recipe in the 1967 version of the Joy of Cooking.  Really, get the book.  But don't get the newer versions (anything that has the name Ethan Becker on the cover, roughly 1995-present).  Because they "modernized" the book.  Which is to say, they made it suck.

The buttermilk waffle recipe:
4-cups pre-sifted all-purpose flour (gotta sift it first to get this right)
1/2 tsp baking soda
2 2/3 tsp baking powder
2 tbsp sugar
1 tsp salt
4 egg yolks
3 1/2 cups buttermilk
12 tbsp unsalted butter, melted
4 egg whites
Mix all the dry ingredients well.  Meanwhile, beat the egg yolks until they're bright, yellow and a bit fluffy looking.  Slowly add the buttermilk while mixing.  Then add the melted butter.  Slowly.  While mixing.

Emulsificate

If you've done this part properly, when you stop mixing, the butter won't separate from the rest of the mix.

Now, clean off your beaters.  You can't have any fat in the egg white, or it won't beat properly.  In a clean bowl with the clean beaters, beat the egg whites until they're stiff.  That means that when you pull the beater up, the egg whites hold the shape that you leave.

Beating egg white

Now mix.  Anytime you have baking powder, you need to mix quickly so you don't over-hydrate the rising power of the baking powder.  So you mix quickly with as few motions as possible.  So mix the egg-fat emulsion with the dry ingredients as with as few motions as possible.  Then fold in the egg whites, again with as few motions as you can, so that the egg whites continue to add stability to the batter.    
Folding egg white


Now fire up your waffle iron, and we're good to go. (As a side note, does anyone know a good waffle iron?  As best as I can tell, all modern waffle irons suck - mine is passable, but certainly not hot enough).

Pour some batter with a ladel onto the hot iron (you'll want to cover about the center of the iron, the waffle will spread - see photo below).
Waffles

Cook the waffle until it's done to the level of brownness that suits you.  Consider this your Canadian public service announcement:
Do yourself a favour.  Buy real maple syrup to serve with it.  Real maple syrup turns waffles and pancakes from being something banal to being something special.  And you're worth it.  Sure, maple syrup is more expensive, but it's soooo tasty.  And you'll use less of it than you will of that garbage phony maple syrup.  The corn syrup in a crappy Aunt Jemima syrup really isn't that tasty.  

11 June 2009

Familiar Food

When it comes to food, I'm not a traditionalist.  I don't buy into the idea that you have to drink beer with barbecue.  Sometimes I drink wine.  I also don't buy into the idea that barbecue needs to be served with a crappy slice of Wonder bread (though many great bbq restaurants do, indeed, serve crappy Wonder bread with their beautiful, tender, slow-smoked meat).  

I'm quite convinced that the majority of people (foodie and otherwise) aren't as interested in having food that tastes good as they are in having food that tastes familiar.  This is why people will argue long and hard about the "proper" way to smoke a brisket, and about whether Tennessee or North Carolina-style pork is "better".  The traditional barbecue community is afflicted with this love-of-the-familiar as much as foodies are.  That's why I was delighted to find this new book by a barbecue aficionado who clearly loves barbecue, but doesn't feel constrained by tradition.


Adam Perry Lang trained in world-class restaurants, before deciding to focus on barbecue, and as such brings a fresh perspective to barbecue.  His recipes are exciting, and look like good fun, including everything from leg of lamb to whole pig roasting, and everything in between.  The instructions included are sufficient for the beginner, so this could be a good introduction to barbecue (though many of the recipes do call for chile peppers that may be challenging to source locally).

I'm looking forward to cooking from this book, and will report back after I've made his beef brisket.  Stay tuned.

10 June 2009

Strawberries with crème anglaise

I love custards.  Crème brûlée.  Ice cream.  And crème anglaise.  Crème anglaise is just a runny custard sauce, good on fruit.  I got the recipe for this one from the New York Times, but shrunk it for 2:
3 tbsp chopped almonds
2 tbsp slivered almonds
1/4 cup milk
1/4 cup cream
2 tbsp sugar
1 egg yolk
strawberries for two
Toast the almonds.  This takes about 3-5 minutes in a dry pan over medium heat.  They're done when they smell great.

Add everything except the egg yolks.  Mix well, and warm up the milk/cream/sugar/toasted almond mixture.  Then slowly pour into the beaten egg yolk, while mixing vigorously.  If you're photographing it yourself, grow an extra arm:

Keep in mind, making a custard is just like making salad dressing.  You're trying to make an emulsion.  Instead of an emulsion of oil and water, it's an emulsion of cream, milk and egg yolks.  Since the egg yolk is the emulsifier, you add the liquid slowly to this.  Add it slowly and mix well, and you get an emulsified custard.  Add it too quickly, or in the wrong order, and get scrambled eggs floating in milk.  YUM!

Pour the mixture back in the pot and mix well, heating it until it thickens slightly.  A crème anglaise is much thinner than a regular custard, so it won't set up like a custard does.

When thickened, pour it through a sieve, then rizzle it on the strawberries, and garnish with toasted or untoasted almonds.  This cream sauce is delicious, easy to make, fast, and a mild, creamy addition to beautiful spring strawberries.  Thank you, New York Times.


06 June 2009

A lazy Saturday calls for...

Absinthe!  Absinthe seems dangerous!  Mysterious!  Exciting!

Everything seems to be coming together around here for me to have absinthe.  I've been wanting to try it ever since I saw Total Eclipse when I was in college.  Watching turn-of-the-century poets drinking fancy green drinks that make them hallucinate looked pretty wild.  Sign me up!  Unfortunately, until relatively recently absinthe was illegal in most countries.  Imagine my disappointment when I learned that it probably wasn't hallucinogenic.  On the bright side, it's probably not hallucinogenic.  

When the New York Times recently reviewed a bunch of commonly available absinthes, I took notice.  When David Lebovitz wrote up a recipe for absinthe ice cream, I took notice.  Odin must be speaking to me.  I went out and bought a bottle of Kübler absinthe at my local liquor superstore, Bevmo, as quickly as possible (one mustn't anger Odin, right?).  I followed the suggestions of the New York Times article, and skipped the cool sugar cube and spoon trick.  Just absinthe and water for me.  But I decreased the amount of water to mix, two parts water to one part absinthe.  When you add the water, a bunch of stuff that is in the absinthe that is alcohol soluble but not water soluble comes crashing out of solution in a bright white cloud.  Neat party trick, really.

Just an ounce of absinthe and two ounces of water made our entire downstairs smell heavenly.  It's sweet-smelling of black licorice.  Mild and only slightly sweet tasting.  Really a relaxing, gentle dessert drink.  I'll keep you posted on whether or not I have trippy dreams tonight...  Happy Saturday.

05 June 2009

I eat critters.

At the beginning of the year, I made a New Year's resolution to eat as many different cuts and critters as possible this year.  I made an admirable start, but have at least partly fallen off the wagon and resorted back to cuts of beef and pork.  I'll try harder!!!

I do have one limitation to my resolution, and to all of my critter consumption activities - I try very hard not to eat anything endangered.  It doesn't seem friendly to eat the last dodo bird.  Then no one else gets to eat any.  I like to share my meat.

For fish, in particular, this is tricky.  In your average sushi place, there are easily 20 different types of seafood.  How do you remember which ones are fished unsustainably, or farmed in rude fashion.  Greenpeace?  Nope, they're nuts.  PeTA?  Even nuttier.  Here's a nice, reality-based resource, run by the Monterey Bay Aquarium, that will keep you educated about what you can eat without worrying that you're contributing to the end of a species.  They've got all kinds of organized lists, and give you as much or as little information as you want.  Check 'em out, and print out their list.  Bring it with you when you're out shopping or eating.

I was particularly happy to see that scallops were on the good fish list.

03 June 2009

Rhubarb pie

You don't often find rhubarb paired with southern-style bbq. Rhubarb is a northern thing. Primarily because it requires cool weather to grow, and it requires a real winter every year. In my own home, in Alberta, rhubarb grows like mad. One mature plant is sufficient to provide all the pie you can possibly want for a year, but most of my large extended family grows multiple plants. So *everyone* has more rhubarb than they can possibly want.

You can imagine my unhappiness to discover when I first moved to Houston, that not only was rhubarb almost never available, but when it was it was $7.99 a pound and looking rather limp. I would carry my limp rhubarb, with mushy brown ends, giddy at the prospect of rhubarb pie, and deliver it to my girlfriend (now wife). Inevitably during checkout, the checkout person wouldn't know what it was, nor know the code, and would ask with fascination, "What do you do with it???".

Rhubarb pie is the single best thing you can do with rhubarb. People always want to adulterate the pie with raspberries or strawberries to which I say, "DON'T ADULTERATE MY RHUBARB!!!" Rhubarb is bright and fresh-tasting. It's wickedly sour, so it needs a lot of sugar in it to cut the sourness. And it makes your teeth feel furry. But it's so crazily delicious, and pie goes so well with bbq, that a simple rhubarb pie seems perfect after a beef brisket.

Rhubarb should be crisp and firm. It should be bright-colored (vibrant reds and greens - they're two different varieties) and the ends of the stalks should be green. If they've been in the store a while, they start becoming soft and brown. Fresh rhubarb is like fresh celery, it should snap when bent. In San Diego, it's more frequently available than in some of my previous homes, so I buy it whenever I see it and chop it up and freeze it (it freezes very well, and can go straight into the pie without thawing - if you let it thaw, it will turn into goop).

What follows is my wife's own words, describing her beautiful, fabulous, amazing rhubarb pie:

The crust

This is my Mom’s pie crust recipe. Per pie:

2 cups flour

1 tsp salt

2/3 cup Crisco (Bbq Dude is always trying to make me use use leaf lard, but I just can’t do it. I like Crisco)

1/3 cup very cold water (mix 1 cup water with some ice cubes and let sit, pour off the 1/3 cup when you need it)

Add the salt to the flour and mix. Add the 2/3 cup Crisco and mash into the flour with your fingers until you’ve made something that looks like the photo. Don’t handle it too much, it should only take about 2 min. This will make mess out of rings on your fingers or bells on your toes, so put them someplace safe. Add the 1/3 cup very cold water and mix with fingers till it all starts sticking together. Don’t handle it too much. Have 4 sheets of wax paper or parchment paper ready to roll the pie crusts out in. Place about 1/4th of the dough in between 2 sheets of paper and “roll like mad” as my Mom says. Move the rolling pin around to generate an at least somewhat circular shape. You want the dough to be about 2-3mm (1/10th inch) thick.

The filling

This is out of the The Fannie Farmer Cookbook 13th edition which I think is a great basic cookbook. I usually set up the filling before I start making the crust, and preheat the oven to 425 degrees. You don’t want the crust to be sitting around drying up while you get the filling ready. If you have to walk away for a few minutes, cover the pie crust with a kitchen towel, or some plastic wrap so it won’t dry up.

4-4.5 cups rhubarb chopped into about 0.5-1 inch (5 cups if you want a taller rounded top)

1 ¼ cup sugar

4 tab flour

1/8 salt

2 tbsp butter

Mix everything but the butter together in a big bowl.

Take the paper off one side of one pie crust and put it down as the bottom crust into a 9 inch pie pan. Peel the other paper off gently and then push gently into the edges of the pie pan. Make sure you have ½ inch of crust beyond the edge of the pie pan. Pour in filling including allll the extra sugar that isn’t stuck to rhubarb. You really need all the sugar. Put 1 tbsp on butter on the top and another one near it. Take the paper off one side of the other pie crust and lay it gently over the top of the pie. Peel the other paper off gently. Use a butter knife to trim the pie crusts to about ½ in beyond the edge of the pan. Use your fingers to fold the top crust under the bottom one all the way around the pie while pressing the fold together. You need to seal the pie so the filling won’t leak out during cooking. Then go back around the pie and smoosh the crust together, making hills and valleys as a pattern, or use something like a fork to smoosh the crusts, making a fork pattern. Finally use something sharp to make a few holes to let the steam out during baking.

Bake for 10 min at 425 (with a cookie sheet underneath because some pies will leak, the leakage will burn, the burn will smoke and smell, etc), then turn down to 350 degrees for 30-50 more minutes or until the top is lightly brown.

If you cook it the day before you want to eat it, and let it sit at room temperature, it will set (=not be runny), but it’s yummy either way.

P.S. I don’t think adding strawberry is a crime against nature. It’s a different pie, and also yummy.

Mistake I’ve made more than once…

1. Close the pie and forget to put the butter on top inside, then I have to cut a line and slide the butter in. tricky, but works out fine.

2. Use frozen rhubarb and forget how much time the frozen rhubarb adds to the baking. We often use frozen rhubarb and forget that it takes 1h-1.5h longer to bake than written above, and forget to plan ahead, and have to bring the pie to people’s houses to cook it because we run out of time. When using frozen rhubarb, try to knock off ice crystals so you don’t add that water, and double the amount of flour in the filling.

---

Final note (Bbq Dude here again) - I'm ashamed to admit, I ate the pie too quickly. I wasn't able to get a shot of a slice of pie. I apologize. But it was worth it.