31 May 2009

Pineapple-habañero salsa


I love hot food.  And habaneros are hot.  Hot hot hot!  The first time I read a recipe with habañeros, it warned "Wear gloves when handling habañeros".  Bah.  I figured, just don't touch my eyes or lick my fingers until after I've washed my hands.  How hot could they be?  So I chopped and seeded the habañeros, and vigorously washed my hands.  I did some more work in the kitchen, washed my hands.  Cleaned the dishes, washed my hands.  And then I wiped my nose.  HOLY SWEET FRACKING BURNING BLAZE OF NOSTRIL DEATH!!!  It took over an hour for the burn to subside.  Due to the magnitude of the burn, and its oil-solubility means that it hangs around for a while, and it is quite unpleasant.  If you don't have gloves, keep your hands off of your eyes, nose, children, small pets...  Just use gloves.  Really.

This salsa is very tasty.  Sweet.  Bright.  A tiny bit of a burn.  I dialed up the heat from the original version, from Gourmet (back when they liked food).
1/2 pineapple, peeled and coarsely chopped (2 cups)
2 tbsp fresh pineapple juice
2 tbsp fresh lime juice
1 tbsp mild molasses
3 scallions, finely chopped
1 minced seeded habañero
1 tsp chopped fresh thyme
3/4 tsp salt
1/4 tsp ground allspice
Chop, mix, and let sit for at least an hour to let the flavours blend.  Enjoy with chips while cooking.

29 May 2009

An open letter to Gourmet

Dear Gourmet Magazine:

I'm writing this letter to thank you for the years of excellent articles and fabulous recipes.  You made me a better cook.  You inspired me to try to cook more difficult things, and you introduced me to the wider world of cuisine.  You helped me woo my wife.  I still cook things from your magazine.  Like that yummy scallop thing.  Or that yummy rib recipe.  

It's because of our great past together that it pains me to write this.  I'm leaving you.  After 12 years, I won't be renewing my subscription.  It's not me, it's you.  Really.  Really.

You no longer seem interested in good food.  For several years now I've suspected that you were phoning it in, putting in recipes that you knew no one would actually cook - better ones could be found elsewhere anyway.  Did you think the internet made you superfluous?  I didn't think so.  Not at first, anyway.

I've been feeling like we weren't good for each other anymore for a while, but I wasn't sure.  I felt loyal to you, to my own detriment, perhaps.  I had a lot of happy memories.  But did you honestly think that anyone would want to even open the magazine when you sent the March 2009 issue with this nasty-looking sandwich on the front?  It might be delicious.  It might be the best thing on earth, but it looks, well... limp.  Let's be honest.  You even think that's one raunchy-looking sandwich.

And what about the most recent issue - May 2009.  You put a few French fries on there.  Sure, you arted them up a bit, by wrapping them in wax paper, but they still look kinda dry and stale.  Your magazine is entitled "Gourmet".  While I agree that a good french fry can be a gourmet item, these ain't that.

It seems that the main things you're interested in are travel and cooking gear.  May I suggest a new name for your publication?  Like "Travel"?  Or "Cooking Gear"?

While we won't have any new experiences together, we'll always have Paris.

Hugs and kisses,

Bbq Dude.

27 May 2009

Scallops & fishy pepper sauce

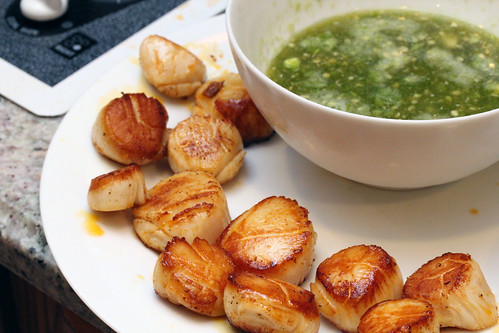
Seared scallops with fishy sauce

I wooed my wife by cooking for her.  There are about half a dozen recipes that I have that I am quite certain are responsible for my happy home life.  This is one of them.  The bright side is, it's fast, it's easy, and it can be prepared as an appetizer or as main course, depending on how many scallops you want to make.

The secret to scallops is ensuring they're cooked properly.  Most restaurants do dreadful things to scallops, overcooking them to the point where they're rubbery and disgusting.  I'm quite convinced that anyone who thinks that scallops aren't heaven hasn't had scallops cooked properly.  Really, scallops aren't that hard, you just have to pay attention to them.

We start with a sauce (this one is from the May 2001 issue of Gourmet back when Gourmet didn't suck).  This one is a fish sauce/vinegar sauce.  I love the flavour of fish sauce, and this spicy, fishy mess is very tasty.  Here's your ingredient list:
1 small garlic clove
1 small jalapeno
2¼ tsp sugar
2 tbsp seasoned rice vinegar
2 tbsp Asian fish sauce
1½ tbsp water
1 tbsp fresh lime juice
as many large scallops as you want to eat (for appetizers, 1-2 each, for main course 4-6 each)
Grind up the jalapeno, garlic and sugar into a nice, hot, sugary paste.  Add vinegar, fish sauce, water and lime juice, blend until you get a nice, green, frothy fishy sauce.  Yum!
Now, pat dry your scallops, season liberally with salt and pepper, and heat a pan over high heat until the oil is screaming hot but not smoking.  Put your scallops into the screaming hot oil.  If you're a pan-fidgeter, you're gonna want to stir the scallops and move 'em around.  Don't.  Scallops are fragile, and you don't want to tear the beautiful surface of the scallops.  Fry 'em for 3 1/2 minutes per side.  Flip once, and don't pan-fidget.

After they've seared 3 1/2 minutes/side, test to see they're slightly flakish on the surface.  Serve with the dipping sauce.  YUM!

Served with a nice sauvignon blanc: 

25 May 2009

Smokin' pizza.

I'm one of those foreigners your mother warned you about.  Stealing your jobs, and stealing your women.  (No seriously, I work in America, and married an American - I guess I'm a bad one).  So I confess, most American holidays don't mean much to me.  So I tend to celebrate Memorial Day as a bbq weekend. Not that different from most Americans, but I have an excuse.

This year, the Memorial Day weekend is a low key event here.  Our first night is a grilled pizza night, which takes advantage of the direct and indirect heat of a large grill.  Smoked pizza is the shiz-nit.  Really.  Everyone loves it (cause who doesn't love pizza??), but at the same time, if done properly, it adds the exotic flavour of smoke and all the fun cheeses you can get your hands on, which makes me very happy. 

This makes 4 largish, individual pizzas:

2 tbsp extra-virgin olive oil
1 C water, room temperature
2 C bread flour, plus more for work surface
1 tbsp whole wheat flour
2 tsp sugar
1¼ tsp salt
1 tsp instant yeast

Mix the yeast, sugar and water, and let the yeast bloom a moment.  I just like to watch the yeast hydrate and get all fired up (I'm a microbiologist - sue me).  Add oil, flours and salt (in that order) and mix (or knead) until the dough starts to feel a tiny bit dry.  As with all bread doughs, you may need to add a little more flour to get the right consistency.

Put into an oiled bowl, cover and let rise for 1-2 hours.  

While it's rising, prep the toppings.  First you'll want an oil.  This pizza isn't tomato-sauce based.  It's not easy to do a tomato-based pizza on the grill.  Too heavy, and too wet.  So we do an oil based pizza (who doesn't love oil?).  Heat:
4 medium garlic cloves, minced
½ tsp red pepper flakes
⅓ C extra-virgin olive oil
until they start to bubble.  Pull them off the stove and pour into a bowl to cool.  You're gonna use this yummy stuff later (and any leftovers goes great on sandwiches).

Also, prep the toppings.  We like tomato on our pizza, so we get the moisture out of some tomatoes by chopping them up, pulling out the seedy, messy gunk, and salting the remaining flesh liberally.  Leave it in a colander over the sink, and shake it every once in a while to get the water out.  You'll be left with a nice, drier, salty tomato chunks.  

For this batch of pizza, we also prepped some pepperoni, shredded fresh basil leaves, fresh pineapple, shallots, leftover smoked brisket chunks and orange peppers.

For cheese?  You can use the standard pizza cheeses, of course, but I prefer a mixture of mozzarella (of course), parmesan and fontina.  Fontina gives that nice odour of dirty feet - but in a good way.  Nice and sweet and fragrant.  It mixes with the flavour of the smoke beautifully.  But of course, it's pizza.  So how can you go wrong?

After rising, cut the dough into four parts, roll into small balls (with a bit of flour, to keep your fingers and the surfaces dry), and cover.  Let rise 15ish minutes.  Roll out with a rolling pin.  This dough is NOT like a regular pizza dough.  You want it to be thinner, so you really need a rolling pin to get the thinness required.  Roll out gently once, let rest 15 minutes, then roll again to get a nice pizza size.  While the dough is resting, get the grill started, get the charcoal to be nice and white hot.  Ultimately you'll want a nice hot fire on only half of your grill surface.

Here's where the trickiness starts - when the fire gets to the right level - transfer the rolled-out dough to the grill.  If you haven't properly floured the surface of the dough, this part will be a TOTAL disaster.  Sticky dough, flames, death.  You listening to me?  So make sure the dough is properly floured.  And make sure the fire isn't too hot.  You want it hot, but no open flame, or you'll singe the dough rather than cook it.

So set the dough on the fire, and let it cook.  Not too long.  DO NOT WALK AWAY FROM THE FIRE.  This part is done really, really fast.  I have entirely too many scorched pizza doughs waiting for me in pizza hell, and we don't need to send any more there.  So really, keep an eye on that dough.  It takes only 45-90 seconds to properly cook the dough.  It'll bubble up on the top - go ahead and pop those bubbles, and pull that pizza dough off when the underside is nicely browned.  It'll look pretty yummy at this point.

Flip it over.  You're going to dress the browned side.  Brush on garlic pepper oil.  Then dress the pizza with the ingredients listed above (when we serve these at a party, we'll let our guests dress their own pizzas).  Just make sure it's not too heavy, otherwise it becomes unwieldy on the grill.  Slide the pizza back onto the grill, away from the fire.  Close up the grill, and smoke it long enough to melt the cheese, generally 5-10 minutes.  When the cheese is melted to your satisfaction, move back over the fire and brown the underside of the dough.  You'll see the cheeze bubble, and it'll be done in less than a minute.  Remove from heat, chop, serve, and bask in smoked pizza glory.

Truly, this is a crowd-pleaser.  You'll never make people happier than serving them something they already love, but in a way they never expected.

Happy long weekend.

23 May 2009

A lazy Saturday calls for...

... a martini!  

A thyme martini, that is.

This martini is one of my favourites.  It's one I discovered in graduate school in Houston in the late 90s, and it's followed me through 3 cities over ten years.

This martini is a simple one if you have easy access to fresh thyme (I grow it in a pot in the backyard specifically for this martini):

3 oz good quality gin (I use Bombay Sapphire)
3/4 oz green chartreuse
sprig thyme

Mix gin and chartreuse, shake in a martini shaker with ice, and strain into a martini glass.  Crush the sprig of thyme (to release the nice flavors and scents) and drop into the glass.  Serve.  The flavour of the gin, chartreuse and thyme mix perfectly.  This seems an obvious mix, as the flavours of all 3 are complementary.  Perfect on a hot afternoon or a cool evening.

22 May 2009

The hunt for mythical San Diego cuisine.

Baltimore.  Calgary.  Edmonton.  Houston.  San Diego.  I've lived in a few cities over the last 15 years, all of them with their own local flavor.  But imagine my surprise that San Diego, in southern California, has the worst restaurant scene of any of these cities.  I had expected that it would be the best, given that California is famous for quality produce, quality wine and quality restaurants.  But apparently that's further north...

While some San Diego foodies despair that there is no restaurant scene in San Diego, that's not true.  You just need to be more careful.  We no longer go anywhere without a prior recommendation.  (We've had meals in restaurants that we chose without assistance that were bad enough that we walked out of the restaurant and went home for dinner.  There are restaurants here that don't even serve food, but serve some unidentifiable glorp instead).  

But this is a happy tale.  In celebration of the upcoming long weekend, my wife and I skipped out of work early, and left the little one in daycare.  Off for lunch in University Heights at Mama's Bakery & Lebanese Deli.
I ordered the Makanek wrap.  A Lebanese beef sausage with pickled peppers, lettuce, tomatoes, spicy-citrus sauce wrapped in a home-grilled flatbread.  Delicious!  Spicy and sweet, the flavour was fresh and bright.  The sausage, pulled out of the wrap was a tiny bit spongy, but that texture disappeared in the mix of crisp and fresh ingredients mixed in the rest of the wrap.  Fantastic!  

My wife ordered the falafel, served with home-made pita bread and hummus.
The falafel was crisp, the hummus was bright, the flavours in this lunch were fantastic.  Everything was fresh and carefully prepared, and eating in their semi-outdoor seating area that takes advantage of perpetually perfect weather seemed quintessential San Diego.

But could there be more?  Just around the corner from Mama's Bakery & Lebanese Deli is another gem of San Diego.  Eclipse Chocolat.  Eclipse is one of the few (only?) truly world-class food establishments that we've encountered here.  We first discovered them a few months ago at the Little Italy Farmer's Market.  Their chocolates are rich and deep-flavoured (and they ought to be, at $6 a pop).  They're not overly sweet, unlike many American chocolates.  For chocolate lovers, Godiva is to Hershey's as Eclipse is to Godiva.  You really taste the chocolate, and not the sugar.  And the different flavours are really fun and creative.  Their Sea-salt nibs are truly delicious, speckled with tiny little salt crystals that pop on your tongue.  So after lunch, we snuck over to Eclipse and picked up a sea-salt nib bar.  Yum.  A simple lunch, a simple dessert on a beautiful afternoon in San Diego.

19 May 2009

Cardamom, saffron & pistachios.

Nothing says southern-style barbecue like cardamom. Ok, well, maybe cardamom is more an Indian spice. But it's yummy, and as such it falls into the purvey of Indirect Heat.

I'm a *huge* fan of cardamom. The sweet spiciness of it is one of the best flavors we cook with. We often start our weekend mornings with a delicious pot of chai tea. Not the bland, insipid teabags you can buy in the grocery store - but an authentic chai that requires ten minutes of spice grinding to prepare. But that's for another day.

Last week I found a beautiful post over at Tartelette. Cardamom Saffron Ice Cream. I just recently acquired the KitchenAid Mixer Ice Cream Maker Attachment and I'm a gear guy, so combine a recipe with one of my favorite spices and the chance to play with my newest kitchen toy, and, well... I'M IN!

So, first part first, I didn't use the recipe at Tartelette. I modificated it. I love the custard deliciousness of a French style frozen custard ice cream so I custardized the recipe (my favourite ice cream book for this type of info is Perfect Scoop by David Lebovitz). And I love cardamom, so I juiced up the cardamom. Here we go.


1 cup milk
3/4 cup sugar
2 cups heavy cream
pinch salt
6 large egg yolks
7 cardamom pods
pinch saffron
1/3 cup raw pistachios
This is a custard. It's a tiny bit tricky. But I'm going to give you all the details that most of the books leave out. Cause they want you to fail. That's the only reason I can think of that no books write down ALL the details you need to succeed at a proper stirred custard. I've failed sufficiently frequently at making yummy custards that I don't want anymore custard failure in the universe. No one will ever love you the way I love you. Ahem. Did I say that out loud?

Okie dokie. Crush the cardamom pods roughly in a mortar and pestle, or with the side of a knife. Warm up the milk, 1 cup of cream, sugar, the salt, and all of the crushed cardamom bits. Get them nice and warm, to around 150-160°F (a kitchen thermometer is inexpensive and will make all of this much easier - so I recommend you get one). Shut off the heat, and leave the cardamom to steep for half an hour or so. Meanwhile, separate the egg yolks, and bring them to room temperature. This part is important. If egg yolks warm too quickly they curdle. Warm 'em slow, and you get deliciousness. Warm 'em fast, and you get scrambled egg in milk.

Beat the egg yolks until they're light and frothy. After steeping, grab a ladle, and beat a ladleful of warm cream gunk into the egg yolks. Whip it into an emulsion. Slowly add the remaining cream mixture bit by bit, until you have a lovely emulsion, yellowish, and lovely and slightly frothy and frothish. Now put it back in the pot, and stir it over low heat with a silicone spatula. Don't stop stirring. Ever. It'll curdle if you stop, so don't. Watch the temperature. If you want a custard, it has to get to between 170 and 175°F. If it hits 185, you're getting scrambled eggs. So keep an eye on that thermometer. As soon as it hits the temperature range you're aiming for, pour it through a strainer into a bowl with the remaining cream, to rapidly cool the custard.

Mix it into the rest of the cream, add the saffron and leave it to cool in the fridge overnight.

24 hours later, run it through your ice cream maker. With the KitchenAid ice cream maker it'll take about 20-25 minutes to get it to the right consistency. That gives you enough time to remove the shells and peels from the pistachios, and chop them to get them a bit smaller.

Click to bigify.
Two minutes before you intend to stop the ice cream maker, add the pistachios. Mix thoroughly, and scoop the ice cream into a container to harden properly in the freezer.

Serve, and win the love and affection of your wife. Best ice cream EVER.

17 May 2009

Where's the beef?


I'm nothing if not a hypocrite.  Not two posts after extolling the virtues of doing fabulous things to cheap cuts of meat, I'm cooking a beef tenderloin on the grill.  I love the flavor that smoke imparts on a piece of meat.  It's really something that you can't imitate in any other way.  But as a beginner, it may seem like a huge commitment to spend 10 hours smoking a brisket.  Will it turn out?  How do you keep the fire under control?  Will it turn out like shoe leather?  Or will you end up with a perfectly done brisket, falling apart with a gentle touch, slightly spicy, moist and smoky?

Easier to start with a cut of meat that's more forgiving, and that's less of a time commitment.  You really have to screw up pretty badly to make a bad tenderloin.  The better the cut of meat, the harder it is to screw up.

The recipe for this tenderloin is modified from the Simply Elegant Beef Tenderloin in my BBQ bible Smoke & Spice by Cheryl and Bill Jamison.  It's a fantastic book, and if you're only interested in owning one book for doing BBQ, this is the one.  Alright, the ingredient list:
1 head garlic
1 tablespoon coarse salt
1 teaspoon olive oil
2 lb beef tenderloin
2 tablespoons black pepper
1 tablespoon white pepper
beef stock
Start by soaking a few pieces of hickory wood in a bowl of water.  Next, crush the head of garlic into individual cloves and toast them in a medium-hot dry pan until they turn brown and smell good.  Pull them out of the pan, cut one end off the clove and squeeze the garlic out of the clove into a bowl.  Mash the cloves up with a fork into a disgusting, yummy smelling mess with the salt.  Dry off the tenderloin with a paper towel, then rub that yummy garlicky-salty mess all over your beef tenderloin.  Massage it in there.

Next, take the black and white peppercorns and grind them into a coarse mess of peppery goodness.  This, you will also massage into into the meat.

When you're done, fire up the grill by whatever your favorite method is, get the grill to a decent 200°F.  When the grill is close to ready, heat the oil in a pan and brown the meat in the hot pan on all sides.

You'll want to eat it now.  Don't.  It's not ready.  It'll be better when you're done. 


Put it on the grill.  You want the fire to be on one side of the grill and the meat on the other side so that the meat never sees direct heat again for the rest of the cook.  Now here's the only tricky part.  Keep the fire going enough to keep the temperature around 200°F.  But don't open the lid too much, cause you'll let the heat out.  But you have to add charcoal to keep the fire up.  But don't open the lid.  Well, you get the picture.  Those few times you open the grill to add some charcoal, toss in a couple of the wet hickory chunks on the fire and slather the beef with a bit of beef stock.  Best to make good use of the times you open it.  After an hour and a half or so, check the internal temperature of the meat, and pull the meat off when it's 140-145°F for medium-rare.  It'll look something like this:


DON'T EAT IT YET!  If you cut into it now, the juices will run all over and make a disgusting mess on your cutting board.  Let it rest for 10-15 minutes before carving.  

We served it with white rice and steamed broccoli and a nice shiraz.  Nothing fancy.  The flavor of this beef tenderloin was really nice.  Peppery, smokey with just a touch of garlic.  Even the pink parts had absorbed some of the smoke flavor, and the peppery rub on the outside comes off as you carve it, spreading it into the rest of the meat.  Delicious!  

16 May 2009

A lazy Saturday calls for margaritas!


I've been on a mission for several weeks to make the perfect margarita. I'm not there yet, but this recipe is a pretty good one. Not too bitter, not too sweet and plenty of yummy tequila flavour. And perfect on a barbecue day...

This recipe is a slightly modified version of one passed on to me by a very good friend in Maryland.

We start with a decent quality tequila (I prefer Herradura añejo for this), Cointreau, agave syrup and fresh limes (don't ever make the mistake of using bottled lime juice for this - it's appalling).


3 oz decent quality tequila
2 oz Cointreau
2 oz fresh lime juice (squeeze it yourself!)
1/4 oz agave nectar (or simple syrup)


The handy part of having a little lime juicer like the one above, is it is extremely convenient for rimming the glass. Just run the lip of glass quickly through the lime juice, and then again through a small pile of kosher salt. And voilà! Rimmed glass! (ahem. did I say that?)

Right. Mix the ingredients listed above, add ice (as desired). Run through the blender (or not - today I prefer it on the rocks). And serve. A beautiful start to a Saturday evening.

---

July 14, 2009 UPDATE

Use the darkest agave syrup you can get your fingers on. It adds a much nicer, richer flavour to the margarita.

15 May 2009

Does the world *really* need another food blog?

Does the world *really* need another food blog? Really?

In all honesty, probably not. There are plenty of truly fantastic blogs out there. And mind-boggling quantities of ridiculously bad ones. Lousy photos, lousy descriptions, lousy food...

Here at Indirect Heat, I aspire to link two communities that have largely been separate - the BBQ community and the foodie community. I'm interested in fantastic food, fantastic wine and the fabulous things smoke and a few hours can do to an otherwise inexpensive cut of meat. I'll be posting on culinary adventures of a home cook, with an emphasis on bbq.

Welcome to my blog.