25 February 2010

Double chocolate valentine cake

My 4-year old is a Valentine's Day baby, so we recently celebrated his birthday. On the evening before his birthday, I handed him my new copy of Rose's Heavenly Cakes and asked him to pick which cake he wanted for his birthday. Without any prodding, he chose the double chocolate Valentine cake, so I made my Valentine baby a Valentine cake.

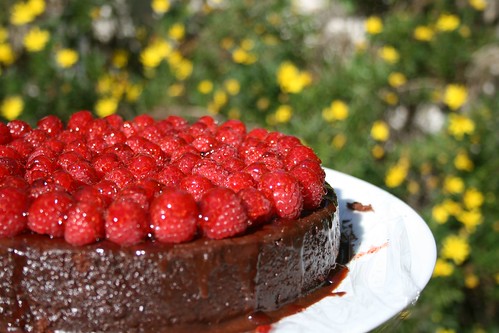
This cake requires 2 pints of fresh raspberries - and it's not exactly raspberry season, even here in southern California. I went to pick up some raspberries, and they looked lovely, but at $5 a pint, it seemed a little steep... But it's his birthday, so $10 worth of raspberries it is.

I've been relatively unhappy with my indoor photos of late, so I only have one photo to show - of the final cake. So salivate over this while you read the rest of the recipe.

Choco raspberry

The cake:

Grease an 8 by 2 inch cake pan. Lay down a piece of parchment paper, cut to fit the bottom of the pan, grease and flour the parchment paper. Preheat the oven to 350°F.

I've been baking by weight of late - it is a vast improvement in terms of reliability of the recipe, so I report this recipe by weight:
1.5 oz unsweetened cocoa powder
4.2 oz boiling water
4 large egg yolks, at room temperature
1.5 oz water
¾ tsp vanilla extract
5.5 oz cake flour
7 oz superfine (or baking) sugar
2 ½ tsp baking powder
½ tsp salt
9 tbsp unsalted butter, room temp
Dissolve cocoa into the boiling water, mix well to get rid of the lumps and let cool.

Beat the egg yolks until they're light and foamy. Mix in the water and vanilla.

Mix the flour, sugar and baking powder until well combined. Add to an electric mixer bowl, and beat in the butter. When combined, pour in the cocoa/water mix. Beat until just mixed. Then add the egg mixture slowly, while beating. Beat for 30 seconds. Scrape anything the mixer has missed into the batter, and beat for another 30 seconds. Pour into the baking pan and use a spatula to smooth the surface. Bake for 30ish minutes, or until when you insert and remove a toothpick it comes out clean.

While the cake is baking, make the ganache:
¾ cup heavy cream
3 oz 60-62% dark chocolate
Scald the cream in the microwave. (Get it screaming hot without curdling it). Chop the chocolate in a food processor, then add the heavy cream, pulsing until smooth. Cool the ganache.

When the cake is done, remove it from the oven, let it cool a few minutes on the stovetop. Poke a whole bunch of holes in the top of the cake with a chopstick. Slather the ganache over the top of the cake, allowing it to fill the holes. Run a knife around the outside of the cake, place a plate upside-down over the pan, and flip over. Shake the cake onto the plate. Remove the parchment paper, and repeat the chopstick stabbing, ganache slathering routine. Yum.

Allow to cool (I covered it and put it in the fridge overnight, then warmed it to room temperature the next day.).

The following day, melt
¼ cup red currant jelly
the the microwave. Wash your 2 pints of expensive-ass raspberries, and embed them into the top of the cake, bottoms up. Gently paint on the red currant jelly, so it basically glues the raspberries to the surface of the cake. This is challenging. I have nothing of help to offer except to say - go slowly.

Before serving, whip:
1 cup heavy cream
1 tbsp superfine (baking) sugar
1 tsp pure vanilla
Serve each slice of cake with a dollop of whip cream. This cake was a wild hit, with everyone. Even my mother-in-law liked it, and she has rather more conservative tastes than me. Her comment, "When I first saw it, I thought - Raspberries and chocolate? That's just disgusting! Who would combine those things?! But this cake was actually quite good!".

This cake is actually quite good.

----

In other news, I'll try to get my indoor photography up-to-speed soon so that I can increase my posting frequency.

09 February 2010

Buttermilk buns

So game day, I'm at home. I'm going to be smoking a pork butt all day, and relaxing anyway, so I figure I might as well make the buns that we're putting the pulled pork on. And I love baking bread and buns. It's just like smoking meat. Even when you aren't doing anything, work is happening. Yeast is growing, dividing and making your bread rise. Call me nerdy, but I find that exciting...

Conveniently, Michael Ruhlman just posted a fun bun recipe, so let's try that:
28 oz all-purpose flour
20 oz buttermilk, room temp
2 ¼ tsp active dry yeast
½ oz salt
2 tbsp honey
butter for greasing a springform pan
1 egg
~1 tsp poppy seeds
Mix the flour, buttermilk, yeast and honey until moist. Let sit for 20 minutes, then knead in the salt, for around 10 minutes, or until the dough gets to be a nice, elastic bread dough. Cover and set aside to rise. Or if you're a weirdo, take the dough outside, photograph it, then move it back inside, covered, to rise.

Dough

I forgot about it for about 4 hours (isn't making bread grand? 2 hours to rise. 4 hours. whatever). And it looked really great.

Risen dough

Butter a springform pan. Cut off roughly 4 - 4 ½ oz chunks of dough, and roll them into little balls. Fit them snugly into your pan, like this:

Balls of dough

Cover, and let rise in a warm place another hour or so. Preheat the oven to 375°F. Beat the egg until a uniform colour and consistency. Homogenous.

Egg wash

Brush a really, really thin layer on the risen buns. The first time I ever egg-washed a bread-dough, I was wayyyy too aggressive with the egg, and the bread ended up tasting like it had a layer of overcooked scrambled eggs on top. Yuck. So now I'm pretty careful. Really, you just want to wet the surface of the buns.

Then sprinkle on the poppy seeds, to whatever thickness is your fancy.

Buns

Bake in the oven for 30-40 minutes, until nicely browned (took me about 32 minutes). And shriek in girlish delight when you remove them, and they look like this.

Baked buns

Oh, yeah, baby! Remove from the pan, tear off a bun, slice in half, and serve. I served them with pulled pork. Yum. A tiny bit too tall for pulled pork sandwiches (oops), but really, really awesome.

Pulled pork sandwich

06 February 2010

Game day

Pulled pork sandwich

SuperBowl Sunday tomorrow. What to do? What to do? Well, while we're not huge football fans (Mrs. Dude and I are hockey fans), Bbq Jr. is *extremely* excited about football. He's 4, and he's cheering for the Coats. "The Colts?" says I. "The Indian Apple Coats." says him. And he says that I can cheer for "the Sinks". Well, okay then.

But more importantly, while we're watching the game on our plasma HD TV (what can I say, Mrs. Dude and I are movie buffs), what will we be consuming? For one, pulled pork sandwiches seems appropriate. And smoked lemonade. Gonna experiment with tequila in the smoked lemonade. If it's a success, you'll hear more about it later. Bbq Jr. will be having a smoothie. And for dessert? Haven't fully decided yet... Any suggestions?

04 February 2010

Roasted rice cakes

I'm sorta loving me some Momofuku. It's a pretty fun book, and there's a fair amount of deliciousness to be found in there. It's no "semi-homemade" *gag*, but it's good fun. This dish, for example, uses no fewer than three other recipes in the book (four, if you count that the ramen broth requires another recipe). But that's fun, in and of itself. You're building towards the other recipes in the book when you're cooking.

This recipe was... challenging... to find the ingredients. Mostly the rice cakes. There are 3 Japanese grocery stores in San Diego. I visited two of them, and even then, I wasn't sure I had the right thing after I left Mitsuwa. They're described in the book as:
"Rice cakes are sold frozen and they keep in the freezer for months. You can buy them at any Korean (or Japanese) grocery store."
Well, the frozen rice cakes that the manager in Mitsuwa sent me to were pink and labeled as a dessert. The other rice cakes they had that even looked remotely correct were in the dried, package section. And they were individually wrapped, and rather looked like bricks. Heavy. Dense. Pasty White. Bricks.

Raw rice cakes

Well, I bought them and brought them home. And hoped they'd be delicious (spoiler alert! They were delicious! Though even now, I'm not sure if they were what the author intended. Ah well, deliciousness happened, who can complain?).

Alright, the rest of the dish:
¼ cup mirin
¼ cup ramen broth
½ cup korean red dragon sauce
¼ cup roasted onions
2 tbsp canola oil
6 rice cake sticks
1 tbsp sesame seeds
½ cup green onion
Mix the mirin and ramen in a saucepan. Boil over medium heat until reduced, a few minutes. Add red dragon sauce and continue to reduce, a few minutes. Add roasted onions, and reserve sauce.

Rice cake sauce

Heat the oil in a pan, once the oil is hot add the little bricks rice cakes to the pan. Watch them puff up. Rapidly.

Frying rice cakes

Neat. Sear 3 minutes to a side, until nicely browned.

Rice cakes

Remove from the heat, chop into small chunks, and toss them into the sauce. Throw in the green onions.

Green onion

Toss well to coat the sauce all over the cakes. Place into a serving dish, then sprinkle on the sesame seeds.

Rice cakes in sauce

Serve as a side or an appetizer. These little crispy, chewy rice cakes are delicious. They have a sweet, sticky interior, and a rich, spicy, hot exterior. The bean paste flavour in the dragon sauce is delicious. And the sesame flavour on top is really, really nice. And as side dishes go, this is an easy one to assemble. Most of the work is in making the ramen, onions and dragon sauce, and that can all be done in advance.

Delish.

02 February 2010

Korean red dragon sauce

Another exciting condiment from the delightful David Chang of Momofuku. You're gonna love what we do with it (post coming soon). And really, get the book. It's awesome.
½ cup water
½ cup sugar
¾ cup ssämjang (fermented bean paste and chile sauce)
2 tbsp usukuchi (light soy sauce)
1 tsp sherry vinegar
1 tsp toasted sesame oil
Okay, I got the fermented bean paste and chile sauce mix from Nijiya, one of the local Japanese grocery stores (thanks KirkK for putting me on to that place). The paste looks like this:

Hot bean paste

And looks like this when you squeeze it out:

Hot bean paste

Yumminess!

Okay, so boil the water and sugar until they dissolve. Cool, and mix in the rest of the ingredients, stirring until dissolved.

Spicy and salty, this is really nice. Try it anywhere you'd put hot sauce. Yum.

Dragon sauce