Yes, yes we did. We roasted a whole pig. And it was delicious. (This piggy was a joint effort with Dr. Ricky over at Dude Are You Going to Eat That?).
Roasting a pig is a bit of an endeavor. First of all, you need a machine serious enough to handle it. After all, you won't fit even a small pig into your oven, or even into a decent size grill or smoker. After much investigation, I went with the Caja China. It's basically a big box. You butterfly the pig, thus dispensing with the need for a rotisserie. And then you put the pig in the box, close up the box, and set a big fire on top of the box, thus turning the box into a big, outdoor oven. It's really that simple (plus a couple details).
But first, you need a pig. Meet Wilbur.
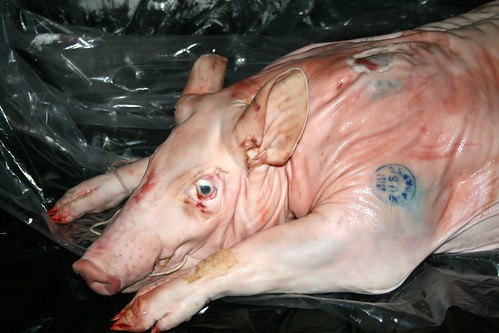
Our pig was a 50 pounder. I had intended to a smaller pig (as this was my first pig), but this party came together rather last minute, and when you're trying to get a pig only 5 days in advance, you take whatever pig your supplier can get you. They could get me a 50 pound pig. So we invited as many people as we could (final turnout, 20 adults, 2 pre-schoolers and 2 infants). Really, if you get a 50 pound pig, invite 50 people. This is a lot of pig.
We followed the basic instructions in Adam Perry Lang's Serious Barbecue . Though, as we'll show, this wasn't quite the perfect preparation. You'll need a bit of equipment that you may not have:
40 gallon coolerCaja China80 lb of charcoalrakeash canlots of icesyringe and needle
I also suggest you have someone to help who isn't squeamish. Dr. Ricky was happy to help, but I know my wife wouldn't have helped me with this. She was happy to watch, but completely uninterested in handling uncooked piggy.
Make sure your pig is thawed out at least 1 day prior to cooking. We picked up our pig 48 hours prior to cooking, and it was still slightly frozen. Packed in ice, it thawed nicely (if you buy it frozen, Zeus help you. You'll need to thaw it several days on ice, I imagine).
Our pig was cleaned (thankfully) and slit down the middle. But we had to crack the ribs and legs to get it properly butterflied. We laid it down on sheets of plastic on the ground, and really leaned into it to crack the ribs.
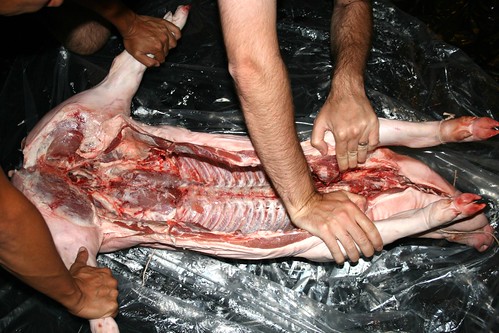
We didn't peel the head open, which may have contributed to later problems, but this part, I'm not sure I would change. But we did pull apart the legs and ribs.
24 hours before cook time, we brined the beast.
5 gallons water4 cups kosher salt120 cups of ice
Mix up the water and salt. Inject some of the brine into the meatier parts of the pig (shoulders, legs, etc). Pour the rest into the cooler with the pig, and pour in the ice on top. Let sit for 12 hours.
Meanwhile, make the marinade.
7 ½ cups freshly squeezed orange juice2 cups lemon juice½ cups lime juice60 garlic cloves5 tbsp ground cumin5 tbsp dried oregano5 tbsp kosher salt
Peel the garlic and toss into the blender. Blend with the spices and some of the juice. Combine all ingredients, and let sit for at least 12 hours, then run through a sieve.
After the piggy has been in the ice cold brine for 12 hours, pour off the brine. Pour the marinade into the cavity, and all over the exposed meat.

Yum. Pack that pig in with some more bags of ice, being careful not to disturb the marinade. Let it sit for 11 hours in the marinade.
An hour before you cook the pig, pour off the marinade, reserving it (this is tricky - if you figure out a good way to do this, please let me know - for us it was messy and slow, ladling it out bit by bit).
Now dry off the surface of the pig, and salt it with no less than 4 cups of kosher salt. Rub it all over the skin, massaging the pig.

This part is to ensure that you have fabulously crispy skin (you're effectively drying out the skin). Let sit for half an hour at room temperature (you're letting the pig warm up now, because you'll be cooking it soon), then rub the salt some more into the skin. This is reallly a fabulous step, and virtually guarantees the best pig skin you've ever seen. Mmmmmm... piggy...
Hopefully the salt looks a bit wet before you hose it off, indicating it has pulled water out of the skin. After a total of one hour sitting in the salt, hose off the salt, and dry off the pig one final time. Don't forget to dry it after you've removed the salt.
Now place it into the caja apparatus. The folks at Caja China have really great photos, so I won't replicate them here. But you basically want to pin the butterflied pig in between the two racks so that flipping it will be easy once it's screaming hot.

Set the pig, rib side up, inside the grease pan in the caja.
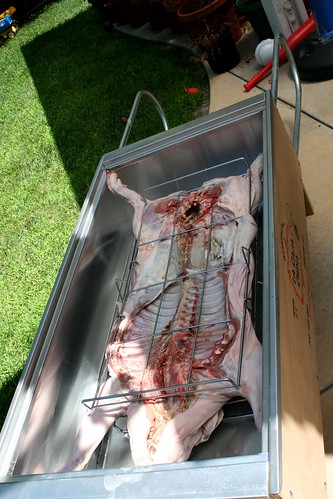
Pour the reserved marinade back into the cavity, and then close up the caja. Place 18 lb of charcoal into the ash pan on top of the caja in twoish large piles. Soak it liberally in lighter fluid (this is one of the few applications where I use lighter fluid, but given that the caja is sealed shut, there's no worry that you'll give an off flavour to the food). And light that baby up.
YEEHA!
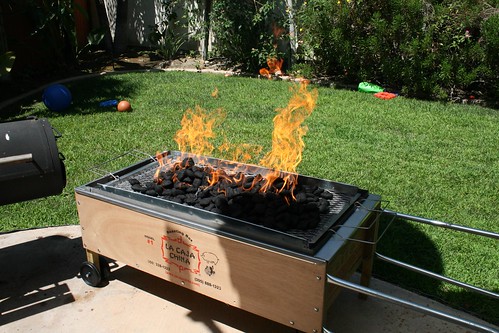
During this time, make the glaze. Towards the end, things happen fast, and you'll want it ready.
2 ¼ cups brown sugar½ cup apple cider vinegarjuice of 8 limes6 garlic cloves10 serrano peppers, stems removed
Run all ingredients through a blender and let sit.
An hour after the the charcoals have ashed over, add 9 more pounds of charcoal, and spread. You can lift off the charcoal tray (leaving the caja closed) and scrape off the ash as needed. Repeat every hour.
Here's my biggest complaint with the instructions in Serious Barbecue. In there, they say, don't open the caja for 5 hours total. If we'd followed that, we would have had nothing left but rendered lard. At 2 ½ hours, my whole yard smelled ridiculously piggy. But I saw a small tendril of smoke coming out the corner of the caja (from inside). I also saw some grease leaking out the bottom. That concerned me (the smoke, more than the grease). So I gently lifted up one corner to glance in. What I saw made me open it even further.
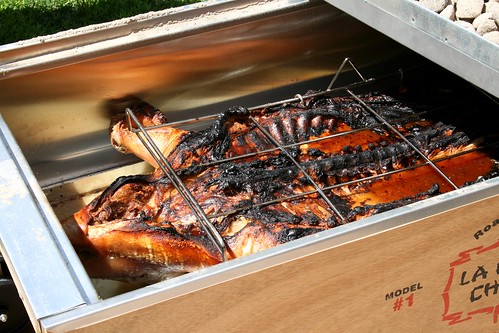
Okay, the sight of black char on that pig briefly freaked me out. But on closer examination, it's just bone and some of the membrane on the back of the ribs that were burned, so we really dodged a bullet here. A meat thermometer in the thigh verified what we thought - this piggy was done.
Interesting note - the grease leaking out the bottom of the caja was the legs. The rest of the piggy was over top of the grease trap. But the legs were hanging out over the edge of the grease trap. And when we opened up the caja, the legs below the knee were gone. They had completely rendered into fat, and only the bones remained. So I would suggest cutting the legs off below the knee prior to roasting. Roasting the legs results in completely obliterating the legs. And you can reserve those legs for other things!
Now we brown the skin. Flip over the pig (be careful, that piggy is crazy hot). And cut Xs into the skin. Cut deep, don't be shy.

Now close up the caja. You'll want to pay more attention here. Check on the piggy every 10-15 minutes. After the first check, brush on the glaze. We're not cooking anymore, we're just browning, and the skin browns fast, so keep an eye on the piggy.

You want it to look like that. YESSSS!!!
Our pig cooked faster towards the head, so we left the fire over the hind legs to cool. But let's take a look at that whole pig, shall we?

Delish.

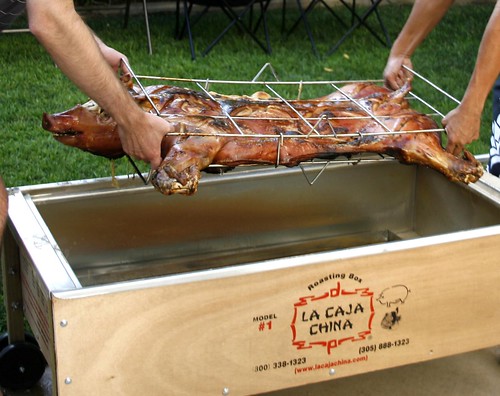
We were ready 2 hours before guests arrived. But even though the pig had cooled (inside the mostly open caja), it was still beautiful. Tender. Delicious. Juicy. AND THAT SKIN!!!
The skin was like the top of a crème brûlée. Holy cow. Sweet, crunchy, caramelized, delicious. My favourite meat was the cheek. Crazy yummy. We served the piggy with various sides, most importantly, a ginger plum sauce.

Make yourself a piggy today. Yum!
(Thanks to Dr. Ricky for helping with cooking the piggy, and to an anonymous friend who took some of the photos).


