26 August 2009

Roast Whole Pig!

Welcome

Yes, yes we did. We roasted a whole pig. And it was delicious. (This piggy was a joint effort with Dr. Ricky over at Dude Are You Going to Eat That?).

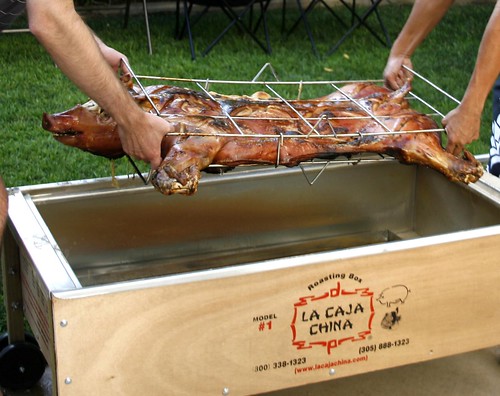
Roasting a pig is a bit of an endeavor. First of all, you need a machine serious enough to handle it. After all, you won't fit even a small pig into your oven, or even into a decent size grill or smoker. After much investigation, I went with the Caja China. It's basically a big box. You butterfly the pig, thus dispensing with the need for a rotisserie. And then you put the pig in the box, close up the box, and set a big fire on top of the box, thus turning the box into a big, outdoor oven. It's really that simple (plus a couple details).

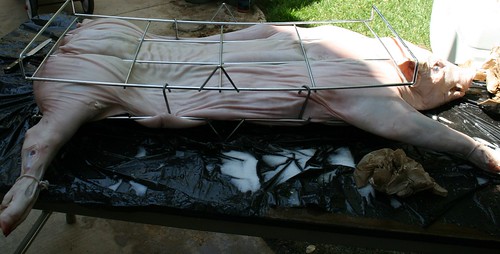
But first, you need a pig. Meet Wilbur.

Piggy

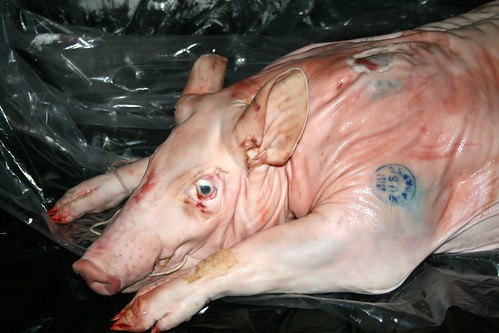
Our pig was a 50 pounder. I had intended to a smaller pig (as this was my first pig), but this party came together rather last minute, and when you're trying to get a pig only 5 days in advance, you take whatever pig your supplier can get you. They could get me a 50 pound pig. So we invited as many people as we could (final turnout, 20 adults, 2 pre-schoolers and 2 infants). Really, if you get a 50 pound pig, invite 50 people. This is a lot of pig.

We followed the basic instructions in Adam Perry Lang's Serious Barbecue. Though, as we'll show, this wasn't quite the perfect preparation. You'll need a bit of equipment that you may not have:
40 gallon cooler
Caja China
80 lb of charcoal
rake
ash can
lots of ice
syringe and needle
I also suggest you have someone to help who isn't squeamish. Dr. Ricky was happy to help, but I know my wife wouldn't have helped me with this. She was happy to watch, but completely uninterested in handling uncooked piggy.

Make sure your pig is thawed out at least 1 day prior to cooking. We picked up our pig 48 hours prior to cooking, and it was still slightly frozen. Packed in ice, it thawed nicely (if you buy it frozen, Zeus help you. You'll need to thaw it several days on ice, I imagine).

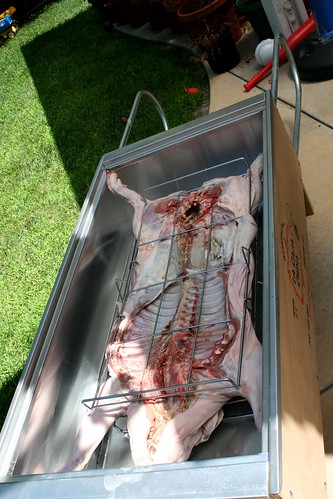
Our pig was cleaned (thankfully) and slit down the middle. But we had to crack the ribs and legs to get it properly butterflied. We laid it down on sheets of plastic on the ground, and really leaned into it to crack the ribs.

Prepping the pig

We didn't peel the head open, which may have contributed to later problems, but this part, I'm not sure I would change. But we did pull apart the legs and ribs.

24 hours before cook time, we brined the beast.
5 gallons water
4 cups kosher salt
120 cups of ice
Mix up the water and salt. Inject some of the brine into the meatier parts of the pig (shoulders, legs, etc). Pour the rest into the cooler with the pig, and pour in the ice on top. Let sit for 12 hours.

Meanwhile, make the marinade.
7 ½ cups freshly squeezed orange juice
2 cups lemon juice
½ cups lime juice
60 garlic cloves
5 tbsp ground cumin
5 tbsp dried oregano
5 tbsp kosher salt
Peel the garlic and toss into the blender. Blend with the spices and some of the juice. Combine all ingredients, and let sit for at least 12 hours, then run through a sieve.

After the piggy has been in the ice cold brine for 12 hours, pour off the brine. Pour the marinade into the cavity, and all over the exposed meat.

Marinating the pig

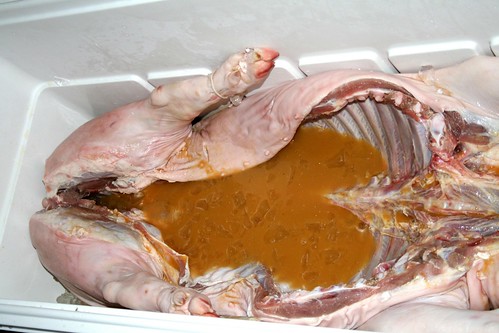
Yum. Pack that pig in with some more bags of ice, being careful not to disturb the marinade. Let it sit for 11 hours in the marinade.

An hour before you cook the pig, pour off the marinade, reserving it (this is tricky - if you figure out a good way to do this, please let me know - for us it was messy and slow, ladling it out bit by bit).

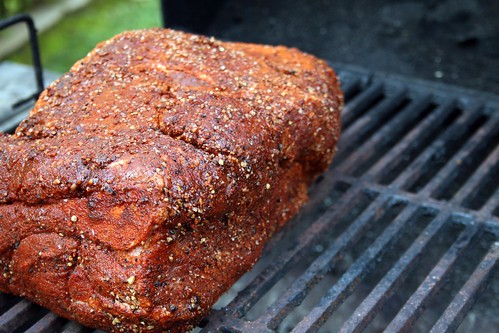
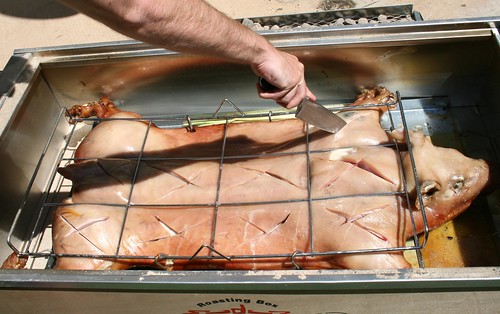
Now dry off the surface of the pig, and salt it with no less than 4 cups of kosher salt. Rub it all over the skin, massaging the pig.

Salted pig

This part is to ensure that you have fabulously crispy skin (you're effectively drying out the skin). Let sit for half an hour at room temperature (you're letting the pig warm up now, because you'll be cooking it soon), then rub the salt some more into the skin. This is reallly a fabulous step, and virtually guarantees the best pig skin you've ever seen. Mmmmmm... piggy...

Hopefully the salt looks a bit wet before you hose it off, indicating it has pulled water out of the skin. After a total of one hour sitting in the salt, hose off the salt, and dry off the pig one final time. Don't forget to dry it after you've removed the salt.

Now place it into the caja apparatus. The folks at Caja China have really great photos, so I won't replicate them here. But you basically want to pin the butterflied pig in between the two racks so that flipping it will be easy once it's screaming hot.

Pinning the pig

Set the pig, rib side up, inside the grease pan in the caja.

Starting the pig in the caja

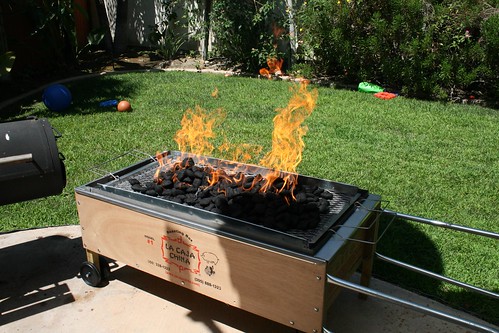
Pour the reserved marinade back into the cavity, and then close up the caja. Place 18 lb of charcoal into the ash pan on top of the caja in twoish large piles. Soak it liberally in lighter fluid (this is one of the few applications where I use lighter fluid, but given that the caja is sealed shut, there's no worry that you'll give an off flavour to the food). And light that baby up.

YEEHA!

Piggy fire

Once the charcoal ashes over, spread it out evenly over the caja using the rake. Now, when I read Serious Barbecue, and he suggested a buying a rake for fire maneuvering, I thought to myself, "I don't really need a rake. I can move those coals around with the tools I use to rearrange coals in my smoker." I bought the rake, just out of thoroughness. Well, let me tell you, 18 lb of white hot charcoal is searing hot. Crazy hot. I can hear the pig sizzling, hot. I wish that the handle on that rake had been about 3 feet longer, because even at the end of the rake, I felt too close to that fire. Holy crap.

During this time, make the glaze. Towards the end, things happen fast, and you'll want it ready.
2 ¼ cups brown sugar
½ cup apple cider vinegar
juice of 8 limes
6 garlic cloves
10 serrano peppers, stems removed
Run all ingredients through a blender and let sit.

An hour after the the charcoals have ashed over, add 9 more pounds of charcoal, and spread. You can lift off the charcoal tray (leaving the caja closed) and scrape off the ash as needed. Repeat every hour.

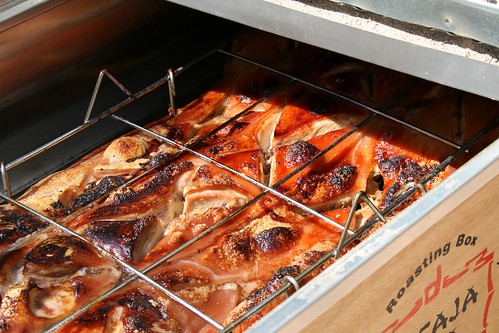
Here's my biggest complaint with the instructions in Serious Barbecue. In there, they say, don't open the caja for 5 hours total. If we'd followed that, we would have had nothing left but rendered lard. At 2 ½ hours, my whole yard smelled ridiculously piggy. But I saw a small tendril of smoke coming out the corner of the caja (from inside). I also saw some grease leaking out the bottom. That concerned me (the smoke, more than the grease). So I gently lifted up one corner to glance in. What I saw made me open it even further.

Oops - charred a bit

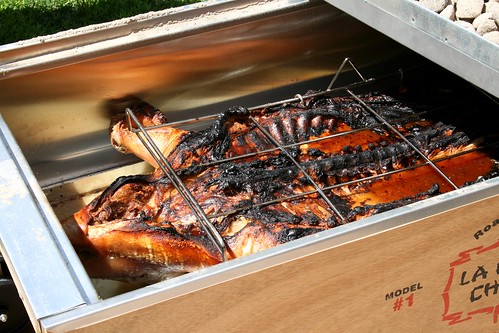
Okay, the sight of black char on that pig briefly freaked me out. But on closer examination, it's just bone and some of the membrane on the back of the ribs that were burned, so we really dodged a bullet here. A meat thermometer in the thigh verified what we thought - this piggy was done.

Interesting note - the grease leaking out the bottom of the caja was the legs. The rest of the piggy was over top of the grease trap. But the legs were hanging out over the edge of the grease trap. And when we opened up the caja, the legs below the knee were gone. They had completely rendered into fat, and only the bones remained. So I would suggest cutting the legs off below the knee prior to roasting. Roasting the legs results in completely obliterating the legs. And you can reserve those legs for other things!

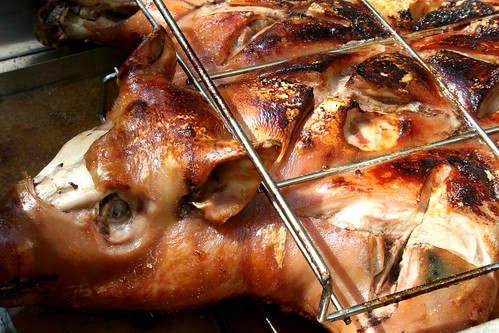
Now we brown the skin. Flip over the pig (be careful, that piggy is crazy hot). And cut Xs into the skin. Cut deep, don't be shy.

Cutting the pig

Now close up the caja. You'll want to pay more attention here. Check on the piggy every 10-15 minutes. After the first check, brush on the glaze. We're not cooking anymore, we're just browning, and the skin browns fast, so keep an eye on the piggy.

Pig in the caja

You want it to look like that. YESSSS!!!

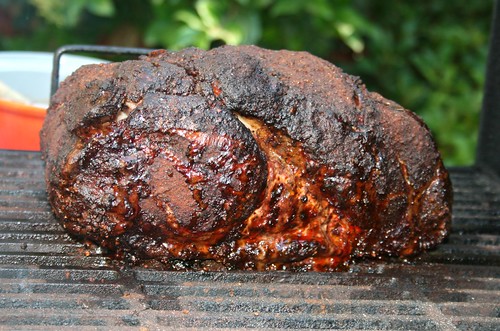
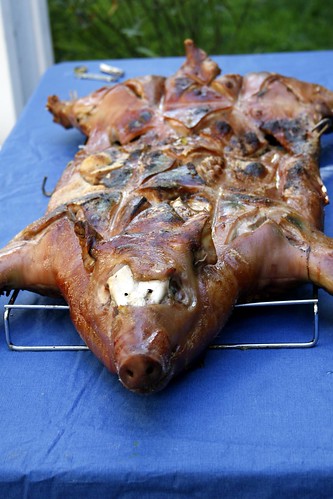
Our pig cooked faster towards the head, so we left the fire over the hind legs to cool. But let's take a look at that whole pig, shall we?
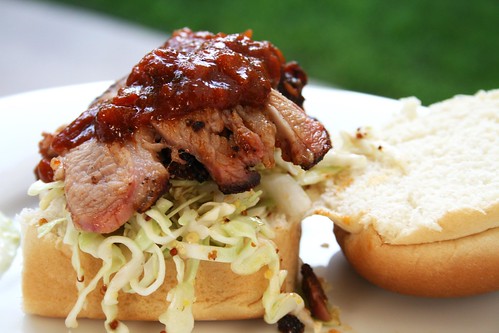
The pig

Delish.

The pig

The pig

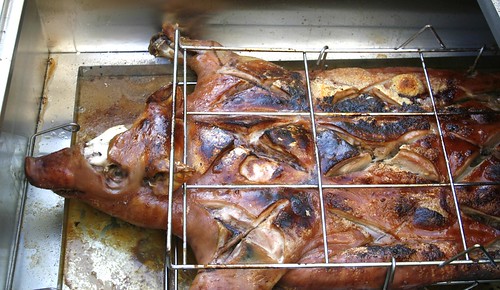
We were ready 2 hours before guests arrived. But even though the pig had cooled (inside the mostly open caja), it was still beautiful. Tender. Delicious. Juicy. AND THAT SKIN!!!

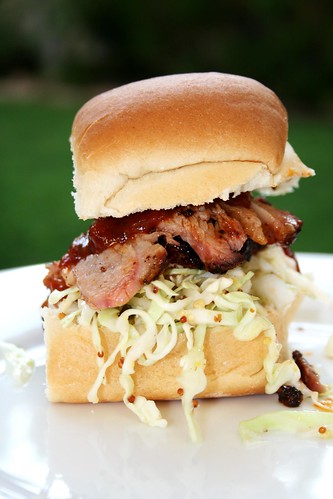
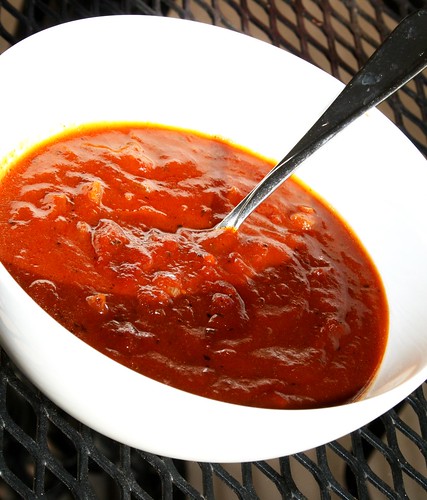
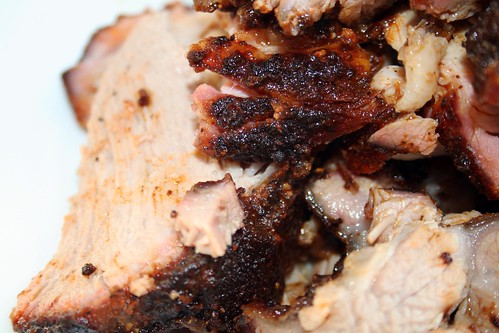
The skin was like the top of a crème brûlée. Holy cow. Sweet, crunchy, caramelized, delicious. My favourite meat was the cheek. Crazy yummy. We served the piggy with various sides, most importantly, a ginger plum sauce.

The pig

Make yourself a piggy today. Yum!

(Thanks to Dr. Ricky for helping with cooking the piggy, and to an anonymous friend who took some of the photos).

25 August 2009

Providence

I recently made a broad, sweeping generalization about East coast eating vs. West coast eating, on the basis of several years of living on the East coast, and 1 year living in San Diego. Basically, I lamented the lack of decent up-scale dining options on the West Coast. I'd like to take it all back. Or at least most of it. There is fabulous dining to be had on the West Coast - in Los Angeles. I still haven't had truly world class food in San Diego, but we had a crazy good meal at Providence in L.A. We were concerned that the food in Los Angeles would be all about the "scene", and not about the food. And perhaps many are. But we succeeded in finding fabulous food at Providence.

I'm still not that guy who takes food in restaurants. I tried once, and I just couldn't do it (and I still don't have a decent phone camera). So I rely on others' photos. Fortunately, JTSO23 at Flickr took pictures of the dinner (very similar dinner!) and graciously allowed me to use the photos.

I started off with a cocktail, the Dark 'n' Stormy. Fizzy ginger beer mixed with Gosling's dark rum (has to be Gosling's, read the link). It was nice, gingery and sweet, but they didn't let me finish it before they brought us the amuse-bouche. This was my main complaint there - they were in too much of a rush. I wanted this meal to take us three hours, they cleared us out of there in two.

We went for the five course tasting menu with matching wines. It was delicious. First up, an amuse-bouche.


This is a trio of interesting dishes. From left to right, it's a gin and tonic cube, a mojito ravioli and a cold carrot soup. The gin and tonic cube wasn't notable, but the mojito ravioli was *great*. It's gelatinized using alginate, so there's a thing skin of solid material around a liquid. You place it in your mouth, and when it breaks you get a splash of liquid mojito. Really fun, and tasty.

The carrot soup was also yummish, with cream and curry flavours. Really fun.


The first course was raw kanpachi with crispy rice crackers, flowering coriander, endive sous vide, soy crème fraiche. This is a dish where the crunchy rice cracker counterpoint to the fish was really nice. The coriander added a bright flavour, and this was really fun to eat. The matching wine was Txakoli, Txomin Etxaniz 2008.

Second course was hokkaido sea scallops (japan), chanterelles, haricot vert, applewood smoked bacon, jurançon sec.

One of my wife's favourite things is scallops, and this scallop was perfect. The sauce around it was particularly nice, and made a nice mild accent to the scallop. The matching wine: Riesling Spätlese, “Alte Reben” Kaseler Nies’Chen, Erben von Beulwitz 2007.

Third course was wild day-boat pacific halibut with burdock, shiso and lemon.

The halibut was like butter. Just fantastic. We asked the server how it was prepared, and he said it was cooked in a "vapor oven". After much prodding, it turns out it was cooked sous-vide, but I think he didn't want to take the time to explain what that meant (as it happens, we knew what it meant). The burdock root was delicious and crunchy, adding a fun textural component to the dish. The matchine wine: Bourgogne Blanc, François Mikulski 2006.

The final course before dessert was veal tenderloin with crushed butterball potatoes, spring onions, hazelnuts, spring garlic confit. Also cooked sous-vide this was deliciously prepared. I was prepared for this to be my favourite course of the evening. It was perfectly cooked, and melted in my mouth. I'm salivating, just typing this.


Look at that veal! Delicious. Matching wine: Sean Thackery, Pleiades XVII.

I confess, I was prepared to be bored by the dessert in this tasting menu. It was miso cheesecake. I'm not a huge cheesecake fan. It's often heavy, and too sweet. Cheesecake done well can be quite good, but it's a little boring, and I was hoping to be excited by the food at Providence.

Well, they didn't let me down. Miso cheesecake with assorted stone fruit, black sesame, white peach sorbet was incredible.


The "cheesecake" was more of a flan, really. And it blended perfectly with the miso sauce and raspberry splatter on the plate. And the sesame cracker underneath added a really nice, mild touch to the dinner. This dessert alone was worth the price of entry. And I had expected it to be my least favourite. Matching wine: Jurançon, “Clos Uroulat” Charles Hours 2007.

All throughout the meal, they matched the wines perfectly. They would bring us a glass a few minutes before the course, and we would sip it and comment, "Mmmmm... this is nice." Upon delivery of the matching course, we would comment, "Holy deliciousness of crazy yummy wine!". The wine matching was really extraordinary.

All in all, we had a fantastic time at Providence, and would go back again. Next time I would try to get a later seating so that we don't have the waiters bringing us our courses so quickly to get us out the door. But beyond that complaint, the dinner was excellent.

Again, a big thanks to JTSO23 for allowing use of the photos.

22 August 2009

Bacon

MMMmmm... bacon...

20 August 2009

Mexican corn

Corn on the grill

This past weekend we a friend was visiting from out of town, and we roasted a pig. (I'll be writing that up as soon as I'm done picking which photos I want to post). While shopping for side dishes, we noticed corn on the cob on sale, 5 for $3. Corn on the cob is quintessential August food. And corn on the grill is even better. I have a continuing lovefest going with Adam Perry Lang's Serious Barbecue book, and thought I would cook the Mexican corn recipe from that book, just cause it looked delicious.

First, you make a pesto:
½ cup cilantro
2 tbsp freshly squeezed lime juice
1 garlic clove
1 tsp kosher salt
1 tsp fresh ground pepper
¼ cup canola oil
¼ cup extra virgin olive oil
Grind up everything except the oil in a food processor. Add the oil slowly, you're trying to make an emulsion.

Meanwhile, unwrap the corn, remove the corn silk, and then wrap the corn back up in its leaves. Soak for 10 minutes to an hour in water while you heat up the grill. Cook a few minutes on each side while wrapped, then unwrap and brown on the grill.

Brush the pesto on the corn, and serve hot. Crazy delicious. Best corn I've ever made.

Mexican corn

(P.S. These photos were taken by a friend who's a photography buff. Thanks!).

18 August 2009

Wereneke

Folded wereneke

It seems every culture has a recipe for dough wrapped around something delicious, and then boiled. My own forbears, the Mennonites, have a delicious dough wrapped creation called wereneke (or vereneke, vereneki - pronounced VURR-REN-NEH-KUH - roll the r's). It is much like the Ukrainian pyrogi (pirogi, pirogy, pyrogy), but in my unbiased opinion, wereneke is much more delicious.

When I was in college, I worked in the summer in a small town in Western Canada that has a large Mennonite population (including members of my extended family). I felt very welcome there. My best friend also lived there with me, so when I was invited over for family dinner, my family would invite him also. Well he had had Ukrainian pyrogi before, and to make him feel comfortable, my aunt made him Ukrainian-style pyrogi, and made wereneke for me. Well imagine all of our surprise when he said, "The pyrogis are okay, but the wereneke are awesome." I felt terrible for my poor aunt. She'd put all that effort into the pyrogis, because she had assumed my friend wouldn't enjoy the wereneke. Everyone had preferred the wereneke. But I didn't want her to feel she had wasted her time, so I piped up, "Oh, I think the pyrogis are great!". My mistake. Forever after, when she made dinner for me or my family, she would include some pyrogis. And I would dutifully eat some and smile, knowing she had made them specifically for me. The things she (and I) did for love...

Wereneke is one of my favourite foods on earth. But it's not just because they're delicious. It's also the communal aspect of working together to make a delicious meal. Everyone knows there part. My wereneke-folding skills have surprised Chinese and Italian friends as well, when they discover I can fold dumplings and tortellini with the best of them.

Here we go. For the dough:
2 C flour
1 tsp salt
½ cup milk
½ cup light cream (or ⅛ C butter and ½ C milk)
3 egg whites (or substitute 1 egg for 2 egg whites)
Mix the dough ingredients. You don't want the dough to be soft, and rollable with a rolling pin, but you don't want it too dry. If you dry it out too much, the wereneke won't fold closed.

Dough

Roll out the dough, and cut into squares. Use only enough flour to keep it from sticking to the dough.

Dough

Meanwhile, make the filling.

1 lb dry cottage cheese
2 egg yolks
salt to taste
pinch cinnamon
Dry cottage cheese can beextremely challenging to find, so you can substitute farmer's cheese if you must (or chenna, even). I hope to learn to make my own some day. But until then, there are substitutes.

Making the cottage cheese filling

Mix the cottage cheese with the other ingredients.

Cottage cheese filling

Put a small amount of filling in the middle of a 2 ½" x 2 ½" square of dough. Be careful to keep the edges clean, as it will make it difficult to close.

Cottage-cheese

Fold the corners over diagonally to make a triangle, and pinch the edges shut. You have to seal them well, or they'll open when cooking.

Folding the wereneke

Keep the folded wereneke on a lightly floured cookie-sheet until you have enough for a full meal. Keep folding.

Also, make some rhubarb wereneke. These are simpler. You merely fold them shut with a spoonful of sugar and half a spoonful of flour - you want to make sure again that you don't get any sugar or flour in the edges of the wereneke, or it won't close.

Rhubarb

Now, start a whole big pot boiling. Cook the rhubarb and cottage-cheese wereneke separately, as they have different cooking times. When you get the pot going to a rolling boil, toss in a dozen or so wereneke, gently, so as not to tear them open.

Boiling wereneke

The cottage cheese wereneke are done as soon as the water is boiling again. The rhubarb ones require a few minutes to cook through (more if you use frozen rhubarb).

Cottage cheese wereneke will look like this:

Cottage-cheese wereneke

Rhubarb wereneke will look like this:

Rhubarb wereneke

While you do a few batches, you can make the sauce:
½ C butter
1 C sour cream
Melt the butter, then stir in the sour cream. Season with salt and pepper.

Sour cream sauce

Serve liberally sauced:

Rhubarb wereneke

Delicious!

13 August 2009

Blackberry thyme crisp

Blackberries

What a wonderful world we live in. This is the best of times for home cooks. (Due to the awesome power of the internets, it's possible that it's also the best time ever to be a model train hobbyist, but I digress).

I recently discovered the absolutely fantastic bbq/foodie blog Livefire. His interests are basically the same as mine, cooking good food using fire, or whatever else is available. (It seems to me that most serious bbq bloggers do pretty purist bbq). Anyway, I was taken with his newest post, blackberry thyme crisp, and knew I had to try it as soon as I read it. So here we go:

Mix:
1 quart fresh blackberries
3 tbsp all-purpose flour
3 tbsp turbinado sugar
6 sprigs lemon thyme
juice from ½ lemon
Blackberry sugar mix

I have several varieties of thyme (primarily to play with in my favourite martini). I thought lemon thyme would go best in this dessert, though I think Curt at livefire used English thyme.

Lemon thyme

Now make a topping of:
½ cup rolled oats
38 cup all-purpose flour
¼ cup brown sugar
4 tbsp melted unsalted butter
Yum. Put the fruit in a small baking pan (I used a small breadpan). Sprinkle the topping on the fruit, and place on a *screaming* hot grill (mine got to 400°F) smoking with a tiny bit of wet hickory, for about 20 minutes, or until the crust is browned, and the fruit is bubbling.

Blackberry crisp

Does that not look crazy good? Scoop up and serve, most deliciously with vanilla ice cream.

Blackberry crisp

This was savory, sweet and delicious. My wife would have preferred it with a bit more sugar. I thought it was perfect as is.

11 August 2009

Pulled pork sandwiches

Pulled pork sandwich

We spent the weekend dining in upscale places in Los Angeles last weekend (to be blogged about soon, I think). On the drive back, I had a craving. A greasy, acidic craving. Pulled-pork sandwiches.

Lots of bbq makes good leftovers, but these sandwiches are the only thing I make that is as good as a leftover at work as it is the night I make it. This recipe uses "The Renowned Mr. Brown" pork butt recipe combined with the "Memphis Mustard Pork Sandwich" recipe from Smoke & Spice, one of my two favourite bbq books, slightly modified. We start with a 6 lb pork butt (actually the shoulder cut of pork) and a rub. Rub this mixture onto the pork butt the night before you cook:
¼ cup fresh ground pepper
¼ cup paprika
¼ cup turbinado sugar
2 tbsp salt
2 tsp dry mustard
1 tsp cayenne
Let the pork butt sit in the fridge overnight. The next day, rub the remaining rub into the pork butt. Let the pork butt warm up for 45 minutes while you warm up your smoker. Once you get the smoker to 200°F, start smoking over indirect heat.

Pork butt

I stoked the fire with hickory and charcoal, to give a nice milk smokey flavour, and I smoked for 9 hours. Nine hours gives you plenty of time to relax, and make the remaining parts of these sandwiches. First, make the sop that you'll be mopping on the pork every time you open it:
rest of rub
2 cups cider vinegar
3 tbsp fresh ground pepper
2 tbsp salt
1 tbsp Worcestershire sauce
1 tbsp paprika
1 tbsp cayenne
Now make the sauce.
3 tbsp butter
¼ cup minced onion
1 cup tomato sauce
1 cup white wine vinegar
3 tbsp Worcestershire sauce
1 tsp coarse salt
1 tsp sugar
¼ tsp fresh ground pepper
18 tsp cayenne flakes
dash of Sriracha sauce
Sauté the onions in butter until soft. Add everything else, and boil lightly for half an hour, until thickened. Cool the sauce and set aside. It'll be vinegary and delicious.

Pork butt sauce

And finally, an hour or two before serving, make the slaw. Chop the cabbage in a food processor, or by hand to a medium-fine consistency. Then mix:
2 cups chopped cabbage
½ cup minced onion
2 ½ tbsp Dijon mustard
1 ½ tbsp white wine vinegar
¾ tsp sugar
¼ tsp salt
Mustard cole slaw

This slaw is sweet, bright and delicious. It'll mix well with the grease of the the pork.

Now, we continue to smoke the meat. And perhaps you find some way to relax, while smoking. I find the real challenge in smoking meat is being patient enough. Nine hours is a long time, and the last few hours, it starts look pretty delicious.

Smoked pork butt

But be patient. Be patient. And you'll be rewarded.

Smoked pork butt

When you pull the meat off the grill, you'll need to continue with your patience. Let it sit 20 more minutes somewhere your cat can't get to it (I tend to put it in a cold oven). As it cools, the juices congeal a bit, so they won't run out when you cut it.

Now, a native Carolinian will tell you that the proper way to pull pork is to use a couple of meat forks to tear it apart, and that cutting it is shameful. I'm not much of a purist, so I cut and pull. The pork shoulder should be soft enough that tearing it is relatively easy, so pulling is possible, but I confess, I prefer the larger slices of it on the sandwich. Again, my goal is bbq that is good, not bbq that is done traditionally. But this is clearly a preference issue.

Pulled pork

Look at that!!! I tend to taste it a bit while chopping. It's hard to wait much longer.

Now assemble your sandwich. We use soft rolls. Layer the coleslaw, the pork and the sauce.

Pulled pork sandwich

Delicious. Acidic. Spicy. A tiny bit greasy. And tasty.

I love these sandwiches, and I'll be the envy of everyone at work for the next week while I eat them at work.